The claim system, end to end
For everyone who touches an expense claim: the staff who submit them, the managers who approve them, the Finance team who pay them, and the administrators who set the rules.
It describes the product as a whole. Each organisation switches features on and off for itself, so a screen described here may not appear for every reader.
Section 1
Getting Started
Signing in, your dashboard, notifications, your profile.
Signing in with your email and password
This is how everyone reaches the system day to day.
- Open the app in your browser and go to the sign-in page.
- Enter your Email and Password.
- Optionally tick Remember me.
- Select Login.

What happens next: if your details are correct, you land on your Dashboard. If your organisation requires a new password (see below), you’re taken to the Set your password screen instead. If you belong to more than one organisation with no organisation chosen yet, you’re taken to Select Organisation instead (see below). If your email or password is wrong, a message appears above the Login button and you stay on the sign-in page.
Signing in with your company account (SSO)
If your organisation uses this: some organisations let staff sign in with the same account they already use for their company email or Microsoft 365, instead of a separate password.
- On the sign-in page, look above the Email/Password form for a button reading Sign in with Microsoft (or another provider your organisation has set up).
- Select it.
- You’re sent to your organisation’s own sign-in page to confirm who you are.
What happens next: you’re brought back to the app already signed in, and land on your Dashboard. The Email/Password form on the sign-in page still works even when this button is present. SSO is an extra option, not a replacement.
Setting a new password when the system asks
An administrator can require you to choose your own password the next time you sign in, for example after your account is first created. When this applies to you, signing in with your temporary password takes you straight to a Set your password screen instead of your dashboard, with a notice that reads “Your account requires a new password before you can continue.”
- Enter a password in New password (at least 6 characters).
- Re-enter the same password in Confirm new password.
- Select Set password & continue.
What happens next: your new password takes effect immediately and your temporary password stops working. You’re taken straight to your Dashboard, no need to sign in again.
Forgetting your password
Use this when you can’t remember your password and need to set a new one.
- On the sign-in page, select Forgot Password?.
- Enter the email address you sign in with.
- Select Send reset link.
- Check your inbox for an email with a reset link, then open it.
- On the page it opens, enter a new password in New password and again in Confirm new password, then select Update password.
What happens next: after step 3, you’ll see “Check your inbox” whether or not an account exists for that email. That’s normal, and it doesn’t confirm one way or the other, for your security. The reset link expires 60 minutes after you request it. After step 5, you see a confirmation and are returned to the sign-in page automatically after a few seconds.
Choosing an organisation, and switching organisation
If you belong to more than one organisation: your login isn’t tied to a single organisation. The same email and password can give you access to more than one, each with its own claims, categories and people.
Choosing an organisation (first time, or when you have no preference set)
If you sign in and the system can’t tell which organisation you mean, you’ll see a Select Organisation screen listing each organisation you belong to, along with your role in it.
- Select the organisation you want to work in.
What happens next: you’re taken to its Dashboard. The system remembers this choice, so next time you sign in you’re usually taken straight there without being asked again.
Switching to a different organisation
- Select your name near the bottom of the left-hand menu.
- In the menu that opens, select the entry showing your current organisation’s name, labelled Switch organisation.
- In the Switch Organisation dialog, choose the organisation you want, then select Switch.
What happens next: the page reloads inside the newly selected organisation, and everything you see afterwards (claims, categories, people) belongs to that organisation instead.
Updating your profile and bank details
Use this to correct your name, set a new password without signing out first, or give Finance your bank details for reimbursement.
- Select your name near the bottom of the left-hand menu, then Edit Profile.
- On the Profile tab, update your Name. Email, Date of Birth and Department(s) are shown for reference only, so ask your administrator to change these. To set a new password at the same time, fill in Current Password and New Password under Change Password (optional); leave both blank to leave your password as it is.
- Select the Bank Info tab to enter your Bank Name, Account Number and Account Holder Name. Finance uses these to pay your reimbursements.
- Select Save Changes.
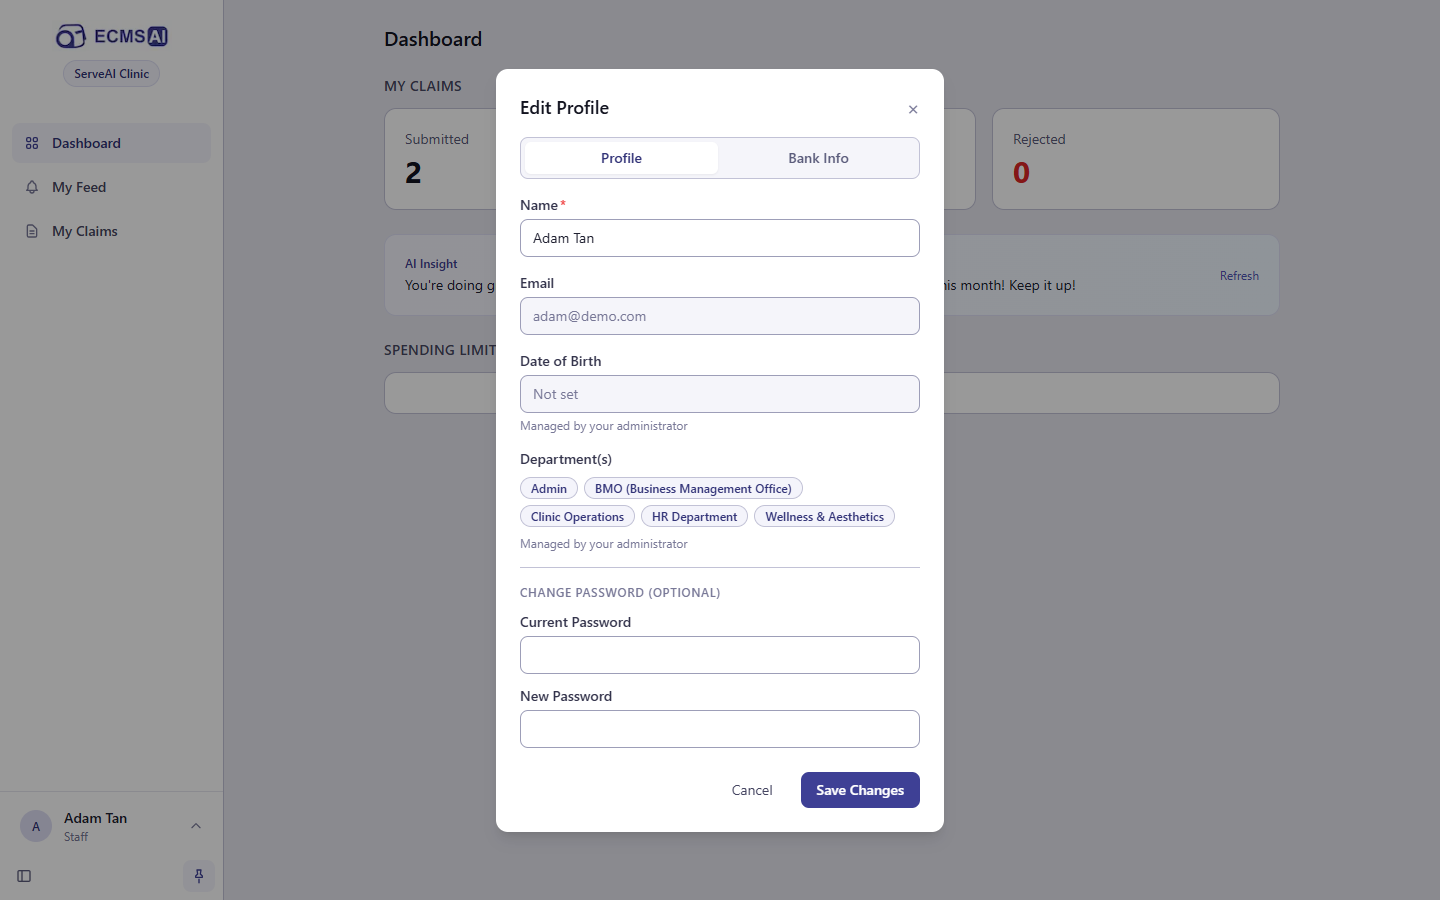
What happens next: your changes take effect immediately. If you set a new password, use it the next time you sign in.
What the dashboard shows
Your Dashboard is the first thing you see after signing in: a quick summary of your own claims.
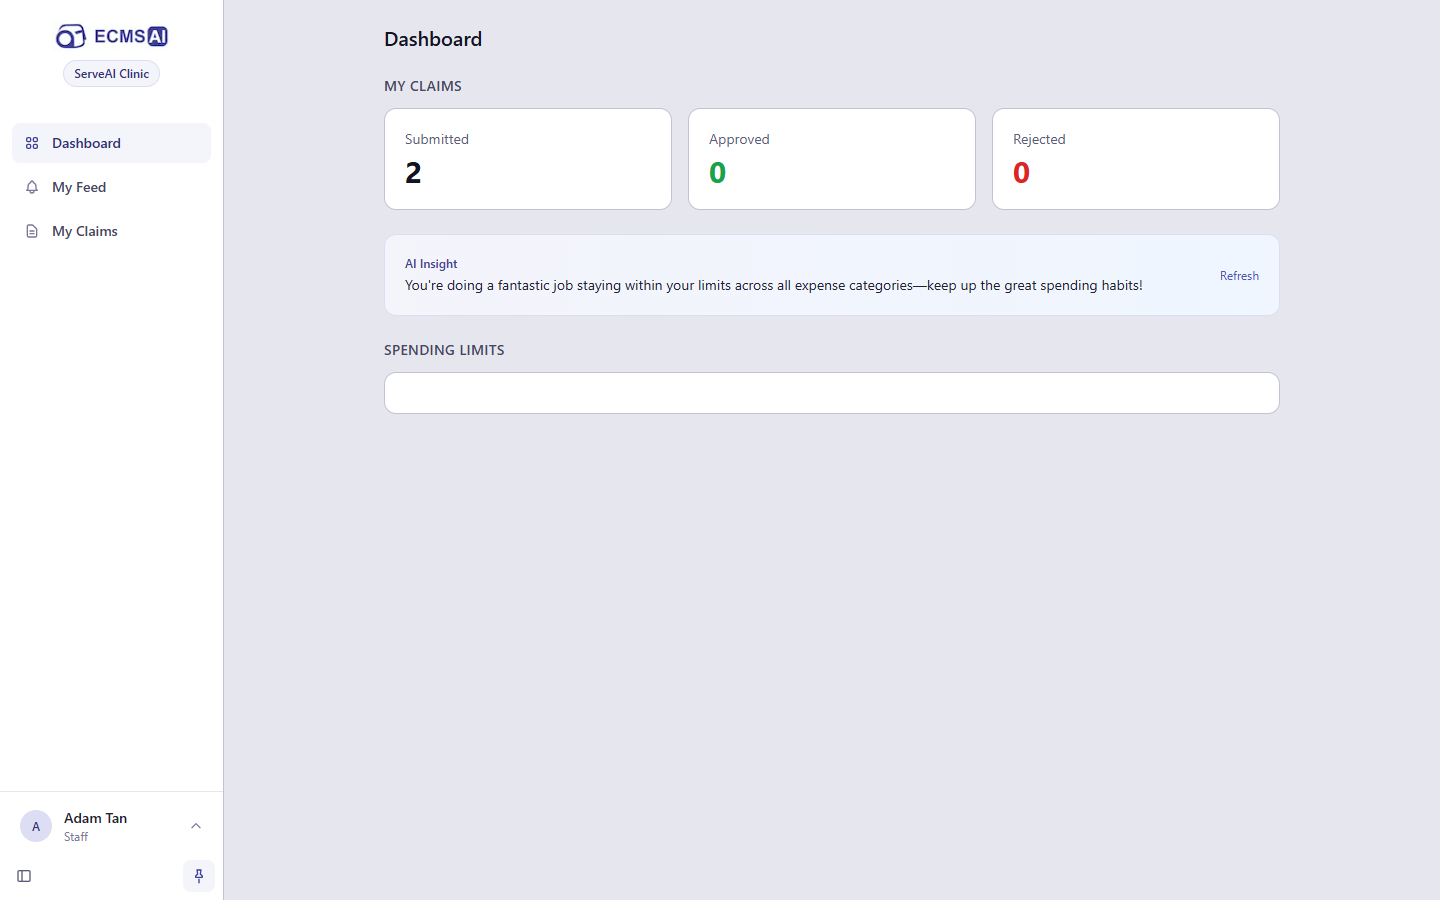
- My Claims: a count of your claims that are Submitted, Approved and Rejected.
- AI Insight: a short, plain-language comment on your recent spending, with a Refresh link to regenerate it.
- Spending Limits: a progress bar per category showing how much of your allowance you have left, if your organisation has set any limits that apply to you. If none apply, this area is simply empty.
If you can see the My Reimbursements, All Claims or Reports menu items, your dashboard also shows a Company-Wide section with organisation-level totals, spend by category, and top claimants. This isn’t shown to everyone.
If you can see a Management Dashboard menu item too, it’s a fuller, dedicated version of that same Company-Wide reporting: the same kind of organisation-level figures, with more of them and more ways to break them down, on a page of its own rather than a section of yours.
What happens next: this page is read-only. Use the menu on the left to go to My Claims, My Feed, or wherever you need to work next.
Finding your notifications
Notifications about your claims (for example, a new claim awaiting your approval) collect in My Feed, reached from the left-hand menu. A red badge on My Feed shows how many are unread.
- Select My Feed in the left-hand menu.
- Use the All / Unread tabs to filter the list.
- Select a notification to open the claim it refers to; doing so also marks it as read.
- If you have several unread notifications, select Mark all read to clear them all at once.
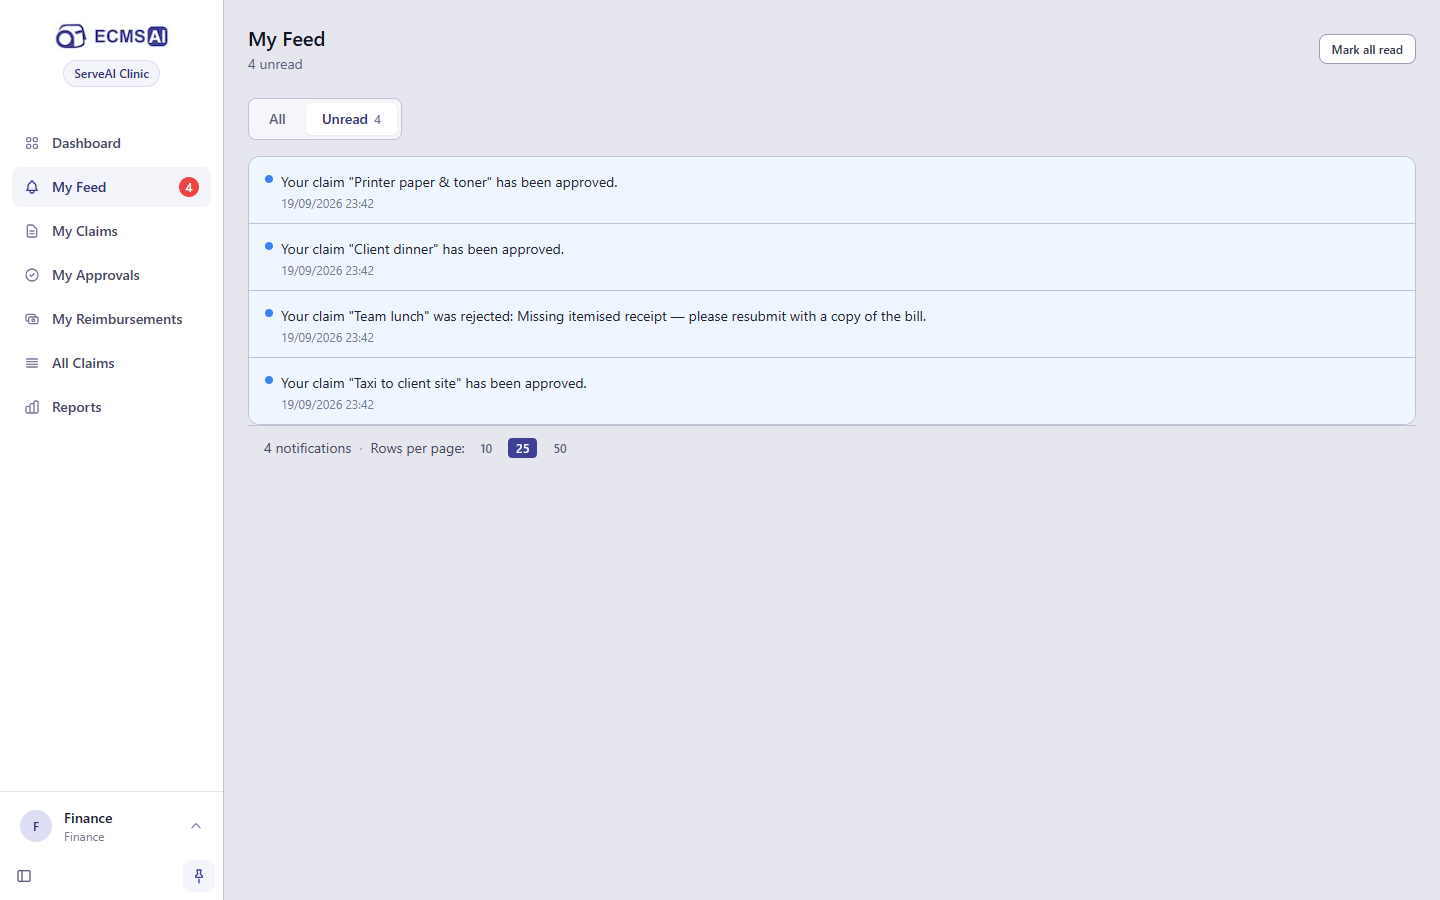
What happens next: notifications you’ve opened lose their unread highlight and no longer count toward the badge on the menu.
One thing worth knowing throughout this guide: most dates you see in the system are shown as DD/MM/YYYY (day/month/year), and that’s the format used consistently in this guide’s own screenshots. A handful of screens instead show a date in whatever format your own browser and operating system are set to, which may or may not be DD/MM/YYYY. A claim’s own Submitted date and Transaction Date on its detail page, the date shown on a claim card, and a delegation’s start/end dates are the ones currently affected. So if a date on screen looks unexpectedly different from the rest, that’s why. It isn’t a sign anything is wrong.
Section 2
How a Claim Moves
What each status means and who acts next.
Every claim carries a status, shown at the top of the claim page, and moves through these statuses in a predictable way: Draft, Submitted, Approved, Rejected, and Reimbursed. This section explains what each one means and who acts next. Later sections show you the actual screens and buttons.
The dotted arrows only apply if your organisation uses that feature. They’re explained under their own statuses below.
Draft
This is a claim you’ve started but not sent anywhere yet.
- What it means: nobody else can see it. It doesn’t count toward anything until you submit it.
- Who acts next: you.
- What you can still change: everything: title, category, amount, receipts, line items, all of it. You can also delete it.
- Who’s notified: nobody.
Submitted
Your claim has been sent for approval.
- What it means: the claim is locked and waiting on one or more approvers.
- Who acts next: depends on how your organisation has set up approval for that category and amount. Most claims go to a single approver, but if your organisation uses this: a claim can need agreement from more than one person in a group before it moves on, or pass through more than one approval step in sequence. Your claim’s status still just reads Submitted the whole time, even while it’s quietly moving between approvers behind the scenes. If nobody has been set up to approve a claim like this one at all, it still sits at Submitted until Finance or an administrator picks it up directly.
- What you can still change: nothing on the form. If your organisation uses this: you can select Retract to pull the claim back to Draft, edit it, and submit it again from scratch.
- Who’s notified: whichever approver (or approvers) the claim is currently waiting on, by email and in My Feed.
Approved
Your claim has cleared approval and is waiting to be paid.
- What it means: everyone who needed to approve it has done so. Or, if your organisation uses this, the claim was small enough to skip approval altogether and was approved automatically the moment you submitted it.
- Who acts next: whoever handles reimbursement marks it as paid, either on its own or as part of a batch of claims paid together.
- What you can still change: nothing. An approved claim can still be turned down before it’s paid, though, if a problem is found with it.
- Who’s notified: you, as soon as it’s approved.
Rejected
Your claim was turned down.
- What it means: an approver, or Finance if the claim had already been approved, decided not to accept it, and left a reason.
- Who acts next: you. You can fix whatever was wrong and resubmit it, or leave it as is.
- What you can still change: anything, the same as when it was a draft. Resubmitting sends it through approval again from the start, exactly like a fresh submission, including, if your organisation uses this, skipping straight to Approved again if it now qualifies for automatic approval.
- Who’s notified: you, along with the reason it was rejected.
Reimbursed
You’ve been paid for this claim.
- What it means: this is the end of the line for the claim. Nothing more happens to it.
- Who acts next: nobody.
- What you can still change: nothing.
- Who’s notified: you, once it’s marked paid.
Who does what
| Who | What they do |
|---|---|
| You (the claimant) | Create, edit and submit your own claims; resubmit a rejected one; and, if your organisation uses it, retract a submitted claim back to Draft. |
| Your approver | If you can see the My Approvals menu, you approve or reject the claims sent to you: sometimes as one of several people who need to agree, sometimes as one step in a longer chain of approvals. |
| Finance | If you can see the My Reimbursements menu, you mark Approved claims as paid, one at a time or in a batch, and can still reject a claim before it’s paid if something’s wrong with it. You can also approve or reject a claim that has nobody else assigned to review it. |
| Administrator | Configures how claims are categorised, routed and approved for everyone else. This is what decides, for any given claim, who its approver is and whether it can be approved automatically. |
Row labels above describe a job, not a fixed role name. Your organisation may call the people who do these things something else, or have one person cover more than one of these jobs.
Section 3
Claiming
Starting, filling in, submitting and tracking a claim.
This section covers everything you do as a claimant. That means starting a claim, filling it in, submitting it, and fixing one if it comes back rejected. For what happens to a claim after you submit it, and what each status means, see How a Claim Moves.
Starting a claim from a receipt photo or PDF
This is the fastest way to start a claim. Upload the receipt or invoice and let the system read it for you.
- Select My Claims in the left-hand menu, then + New Claim.
- In the Upload Invoices box, drag your receipt or invoice onto it, or select it to browse for the file (JPG, PNG or PDF, up to 10 MB).
- Wait while it’s read. This takes a few seconds.
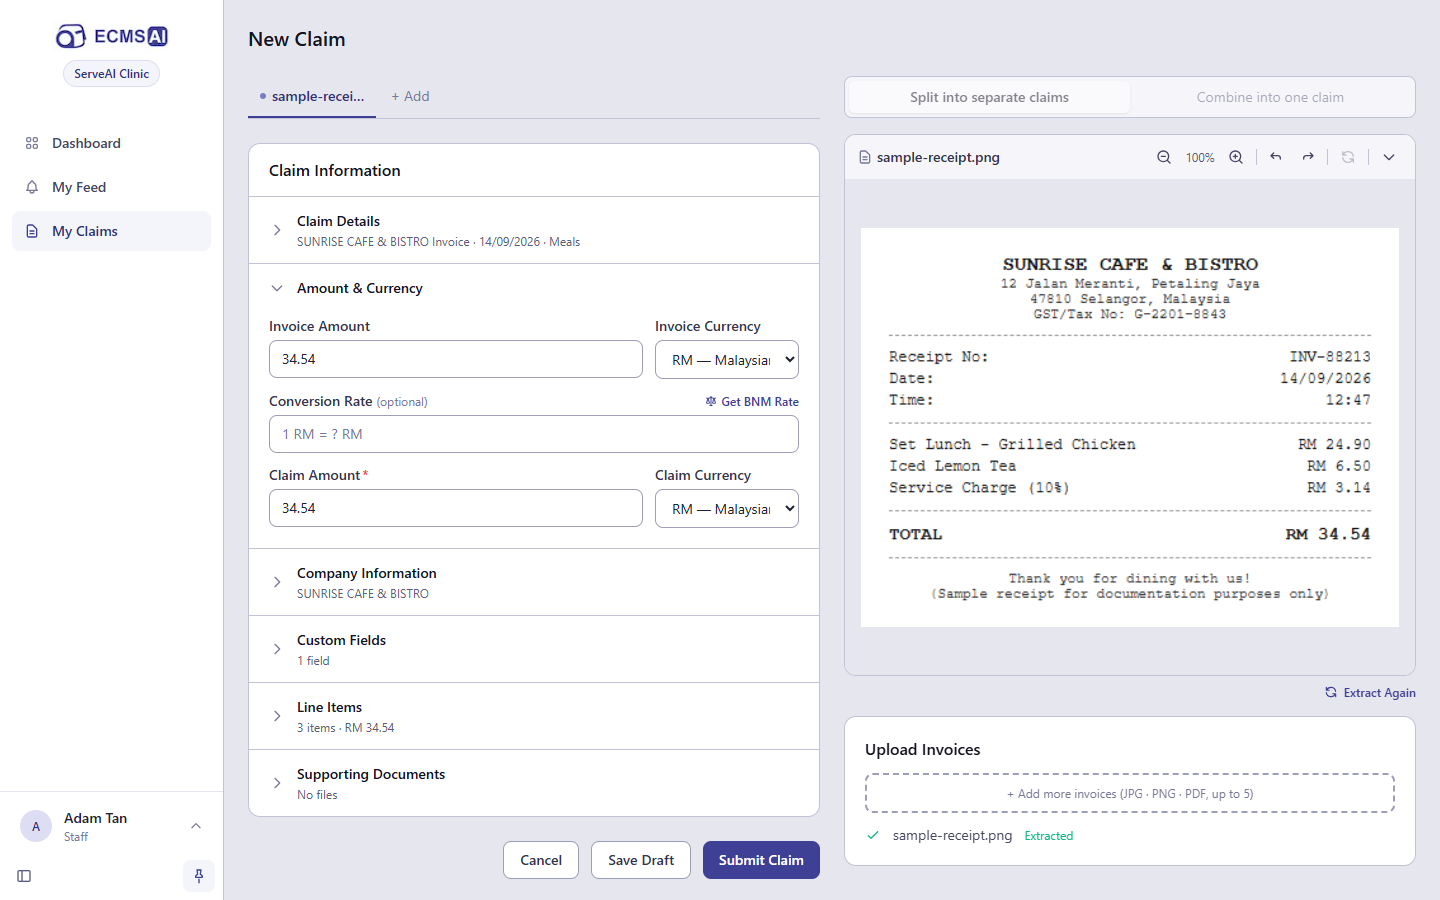
What happens next: the file attaches to the claim, and a preview appears alongside the form. Whatever the system can read from it (vendor name and address, date, amount, currency, and any line items) fills in the matching fields for you, and the Category is guessed automatically from the title and line items. Nothing is final, so check every pre-filled field before you submit, especially the amount and date. Sometimes nothing can be read at all, for example when a PDF turns out to be a scanned image with no selectable text. When that happens, the file is still attached and marked Extracted in the upload box, but none of the fields actually fill in, so you’ll need to enter them by hand. If the upload itself fails outright, the file’s entry shows as failed instead and nothing is attached; just try uploading it again. (Uploading an invoice from a claim’s own Edit page, instead of here, does tell you directly when a PDF has no readable text, and suggests a JPG or PNG instead.)
A small Extract Again link appears once a file is attached, in case you want to re-run the reading on the same file (for example, after uploading a clearer photo of the same receipt).
You can add more than one receipt to the same upload box. By default, the toggle above the upload box is set to Split into separate claims, so each file becomes its own claim, in its own tab, and you can review and submit them one at a time or all together. Select Combine into one claim instead to merge every file you add into a single claim. This is useful when several receipts belong to one trip or one expense.
Starting a claim from the form
Use this when you don’t have a receipt to scan, or prefer to type everything in yourself.
- Select My Claims in the left-hand menu, then + New Claim.
- Leave the Upload Invoices box alone and fill in the form directly, starting with Title.
What happens next: see Filling in the details below for what each field means.
Starting a claim by chatting
Instead of the form, you can describe your expense in your own words and let an assistant turn it into a claim. This page isn’t linked from the menu, so you’ll need its address from your administrator (or your organisation may link to it from somewhere else in the app).
- Go to the claim chat page.
- Answer the assistant’s questions about your expense (what it was for, how much, when, and so on) in the message box, and select Send after each one.
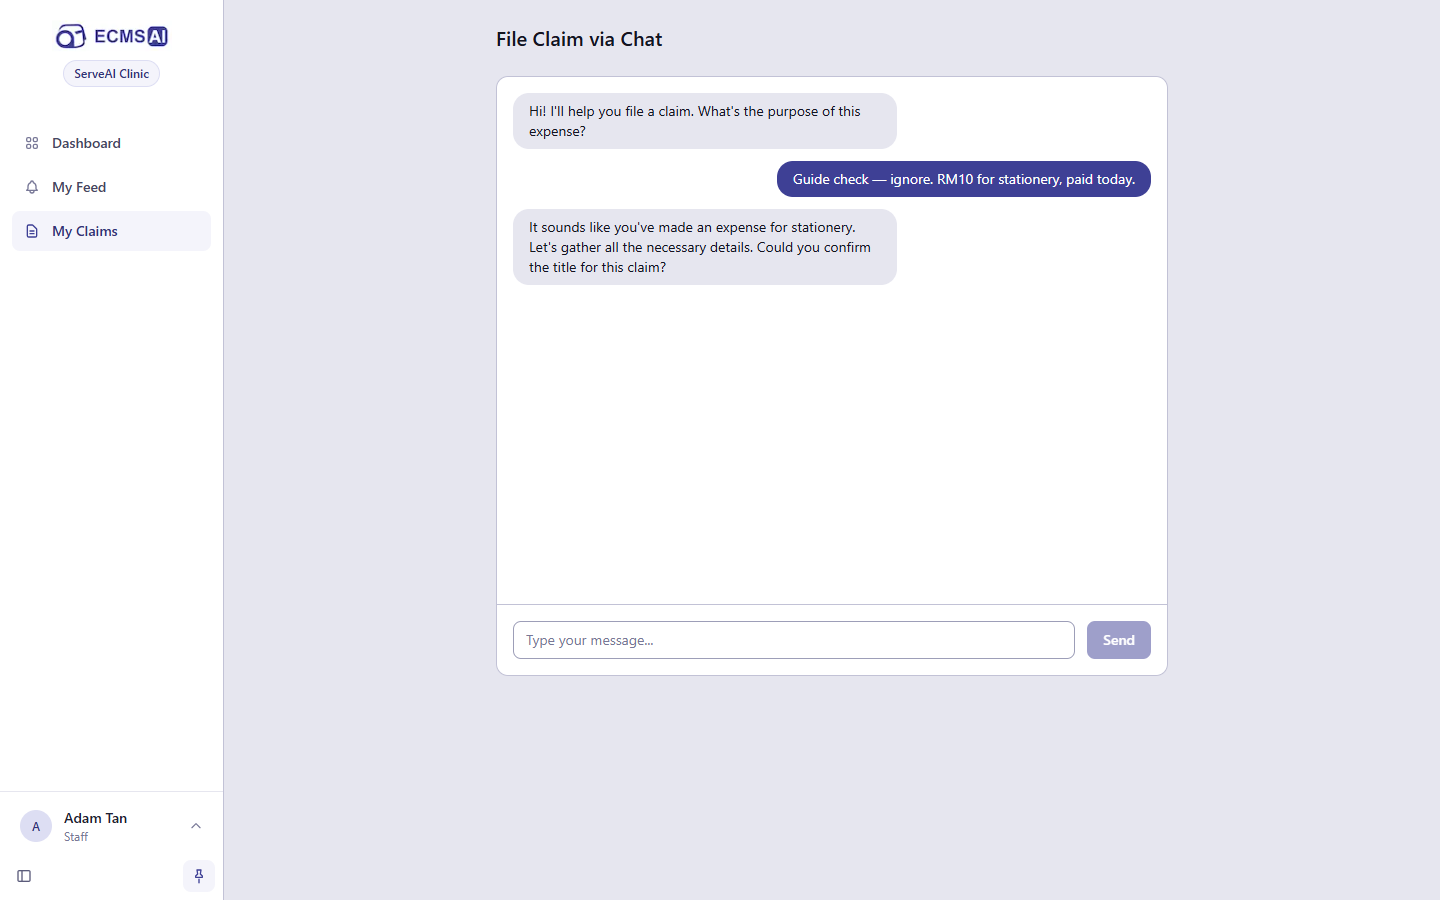
What happens next: once the assistant has enough information, it creates a Draft claim behind the scenes and shows you a summary of what it collected. Select Review & Submit to open the claim and check it over. The chat only gets you a starting draft: you still review and submit it the same way as any other claim, and can correct anything the assistant got wrong before you do.
Filling in the details
The claim form is organised into collapsible sections: Claim Details, Amount & Currency, Company Information, Custom Fields (if your organisation defines any), Line Items, and Supporting Documents. Only one section is open at a time. Select a section’s header to expand it, and its summary (shown when it’s collapsed) gives you a quick look at what’s already filled in without opening it.
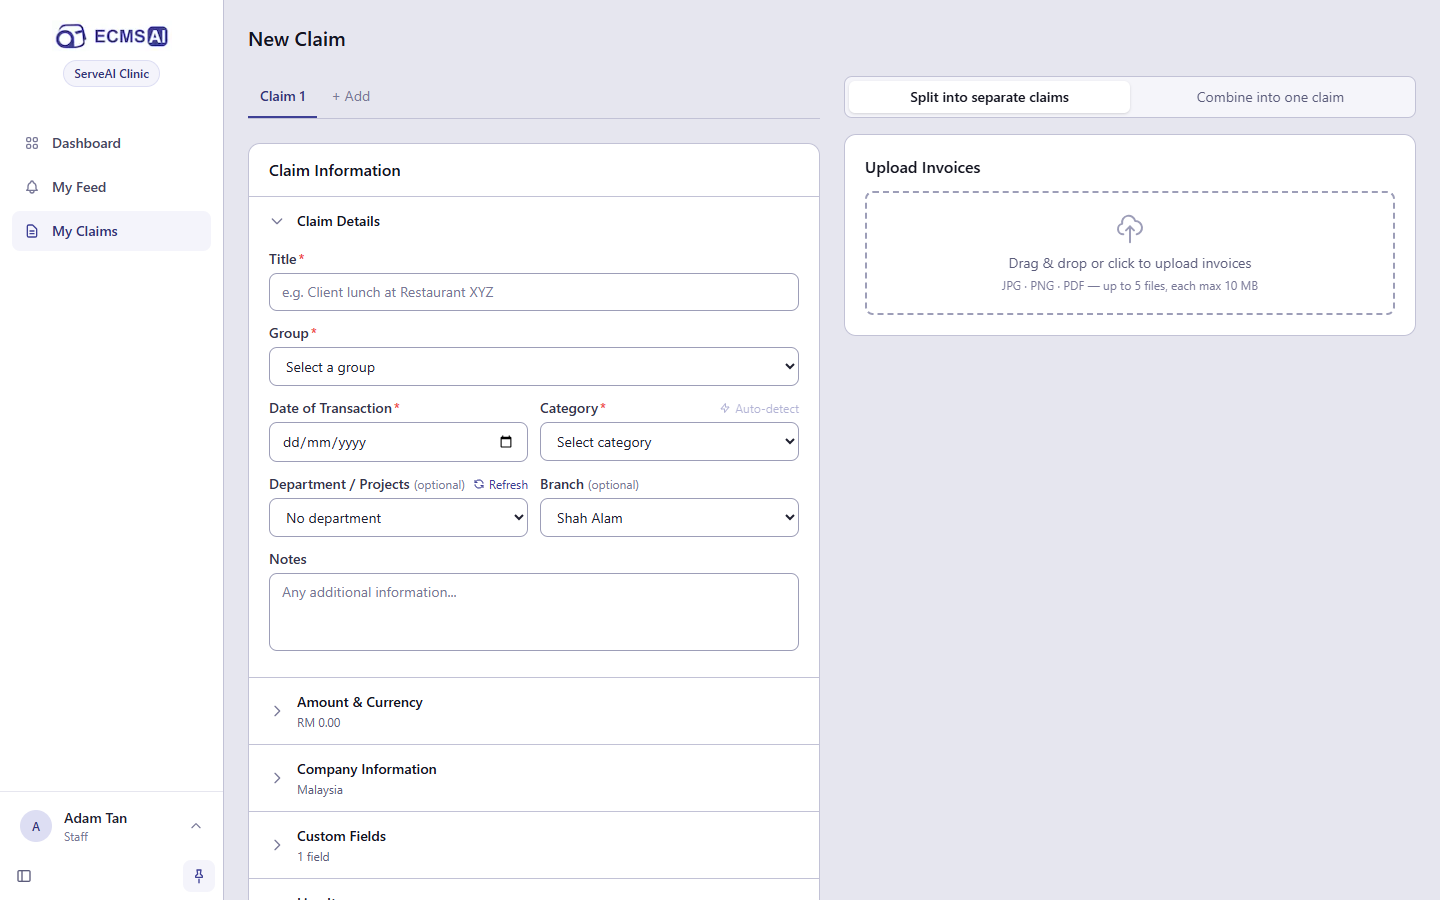
Fields in Claim Details, in the order they appear:
- Title: a short description of the expense. Required. Auto-filled from the vendor name if you upload a receipt, but you can always change it.
- Group: if your organisation uses this: which category group this claim’s category belongs to. Required when shown. Pick this before Category, since it determines which categories are offered below it.
- Date of Transaction: when the expense happened, not when you’re filing the claim. Required.
- Category: what kind of expense this is. Required. Select Auto-detect (next to the label) to have it suggested from your Title and any line items you’ve entered. This becomes available once you’ve typed a title. If nothing suitable is found, you’re told to pick manually or check with your administrator. If your organisation uses rate or limit tables for a category: choosing it may add one or more extra dropdowns here, whatever your organisation’s table for that category needs to look up the applicable rate or limit.
- Department / Projects: optional, and only shown if you belong to at least one department. It defaults to your usual one if you have one; change it if this expense belongs to another department you’re a member of.
- Branch: optional. Defaults to your own assigned branch if you have one.
- Notes: optional free text for anything else worth recording.
Fields in Amount & Currency (see Claiming mileage if the category you picked is a mileage one, and Claiming in another currency for what the invoice/conversion fields below are for):
- Invoice Amount and Invoice Currency: the amount and currency shown on the actual invoice or receipt. Optional, and filled in automatically from a scanned receipt.
- Conversion Rate: optional. How many units of your claim currency one unit of the invoice currency is worth.
- Claim Amount and Claim Currency: the amount and currency you’re actually claiming. Required. If the invoice currency matches your claim currency, this fills in automatically from the invoice amount.
Fields in Company Information (details about the vendor, mostly filled in from a scanned receipt but all editable):
- Company Name
- Company Address
- Postcode
- State (a dropdown, for a Malaysian address) or State / Province (free text otherwise)
- Country: defaults to Malaysia on a new claim; typing a different country switches State above to free text.
- Tax Invoice / Receipt # / e-Invoice No.
Custom Fields: if your organisation uses this: your administrator can define additional recording dropdowns that apply to every claim (for example, which entity or project it belongs to). These are for record-keeping only. They don’t affect rates, limits, or who approves the claim. A field marked with an asterisk is required before you can submit.
Once you’ve filled in Title, Category and Date of Transaction, you can move between sections freely. The form saves your progress automatically a few seconds after you stop typing, so switching sections or accidentally closing the tab won’t lose your work (see Saving a draft and coming back to it).
Claiming mileage
If your organisation uses this: when the category you pick has a per-kilometre rate configured, the Amount & Currency section replaces the invoice/amount fields above with a Mileage Details box instead.
- Open Amount & Currency.
- Enter Distance (km).
- Optionally fill in Start Location, End Location and Vehicle Type.
What happens next: the rate per kilometre is shown at the top of the box, and Calculated Amount updates as you type the distance, and that figure becomes your claim amount. If no rate has been set up for the category, you’ll see a notice to contact your administrator instead of a rate.
Adding line items
Line items break a claim down into its individual parts. This is useful for an itemised receipt, or a claim covering more than one thing.
- Open Line Items.
- Fill in Description and Amount for each item already listed.
- Select + Add Item for another row, or the × next to a row to remove it.
What happens next: the Items total at the bottom updates as you go. This is for your own breakdown. It doesn’t need to match your Claim Amount exactly, but a large mismatch is flagged as a warning when you submit (see Submitting your claim). A line item created from a scanned receipt shows a View link to its source image.
Attaching supporting documents
Use this for anything beyond the main invoice: a bank statement, a bank-in slip, or an additional receipt.
- Open Supporting Documents.
- Drag a file onto the box, or select it to browse for one (JPG, PNG or PDF, up to 10 MB each, up to 5 files per claim, see A file won’t upload if you need to attach a spreadsheet or document instead).
What happens next: each file appears in a list with View and Remove options. Once a claim is submitted, only an administrator can remove an attachment: as the claimant, you can only add or remove files while it’s still a Draft. If you haven’t filled in Title, Category and Date of Transaction yet, attaching a file saves the claim as a Draft first automatically; if those three aren’t filled in, you’re asked to complete them before you can attach anything.
Claiming in another currency
Use this when the invoice or receipt is in a currency different from what your organisation claims in.
- In Amount & Currency, enter the Invoice Amount and select the Invoice Currency.
- Enter a Conversion Rate, or select Get BNM Rate to fetch the current rate from Bank Negara Malaysia for that currency.
- If you fetched a rate, review the figure shown, for example “Invoice Amount × Rate = Converted Amount”, and select Apply to use it as your Claim Amount.
What happens next: the BNM rate is shown with the date it was quoted, alongside the buying and selling rates for reference. Applying it fills in Claim Amount in your claim currency; you can still adjust the figure by hand afterwards if needed.
Saving a draft and coming back to it
A claim doesn’t have to be finished in one sitting.
- Fill in at least Title, Category and Date of Transaction: these are required even to save a draft. Everything else, including the amount, can be left blank for now.
- Select Save Draft.
What happens next: you’re taken to the claim’s own page, which now shows it as a Draft. The form also saves your progress automatically a few seconds after you stop typing, once the draft exists, so you don’t need to select Save Draft repeatedly. To come back to it later, find it in My Claims and open it. A Draft shows an Edit Draft button to keep filling it in, and a Submit button once you’re ready to send it for approval. See Submitting your claim below for what happens next, and for an important difference between these two ways of submitting.
Checking what’s left of your allowance
If your organisation has set a spending limit on a category, you can see how much of it you have left before you submit.
- On your Dashboard, the Spending Limits section shows a progress bar per category with a limit that applies to you, see What the dashboard shows.
- While filling in a claim, once you’ve picked a Category and entered a Claim Amount, a banner appears near the bottom of the form, above the Submit Claim button, if this claim would approach or exceed the applicable limit, before you even get to Submit.
What happens next: this is informational. It doesn’t stop you from filling in the rest of the claim. See below for what happens when you actually try to submit one that trips a limit.
Submitting your claim, and what the limit warning means
Once a claim is filled in, submitting sends it for approval. See How a Claim Moves for what happens after that.
If you’re submitting a Draft you saved earlier, there are two ways to do it, and they behave differently. Opening the Draft from My Claims and selecting Submit right there on the claim’s own page skips straight to submitting, with no chance to review the warnings described below first. To see them before you commit, select Edit Draft instead and submit from the form itself, as covered here.
- Select Submit Claim (or Submit This Claim if you have more than one claim open in separate tabs) at the bottom of the form.
What happens next: if nothing looks unusual, the claim is submitted immediately. You may see a brief confirmation with a View claim option before you’re taken to it. Otherwise, a Review Before Submitting dialog appears, summarising everything worth your attention before you go further. You may see one or more of:
- Spending Limit Exceeded or Approaching Spending Limit: this claim would put you over, or close to, a limit your organisation has set for this category.
- Category May Not Match: the claim’s content doesn’t look like it belongs in the category you picked.
- Possible Duplicate Claim: it matches an existing claim of yours closely enough (same amount, vendor, reference number, or attached file) to be worth a second look.
- Submission Window Exceeded: the transaction date is further in the past than this category allows for a new submission; a different category may allow more days, fewer, or have no deadline at all.
- Amount Mismatch (or Faulty Invoice, if you attached one and it’s the only line item): your line items don’t add up to your claim amount.
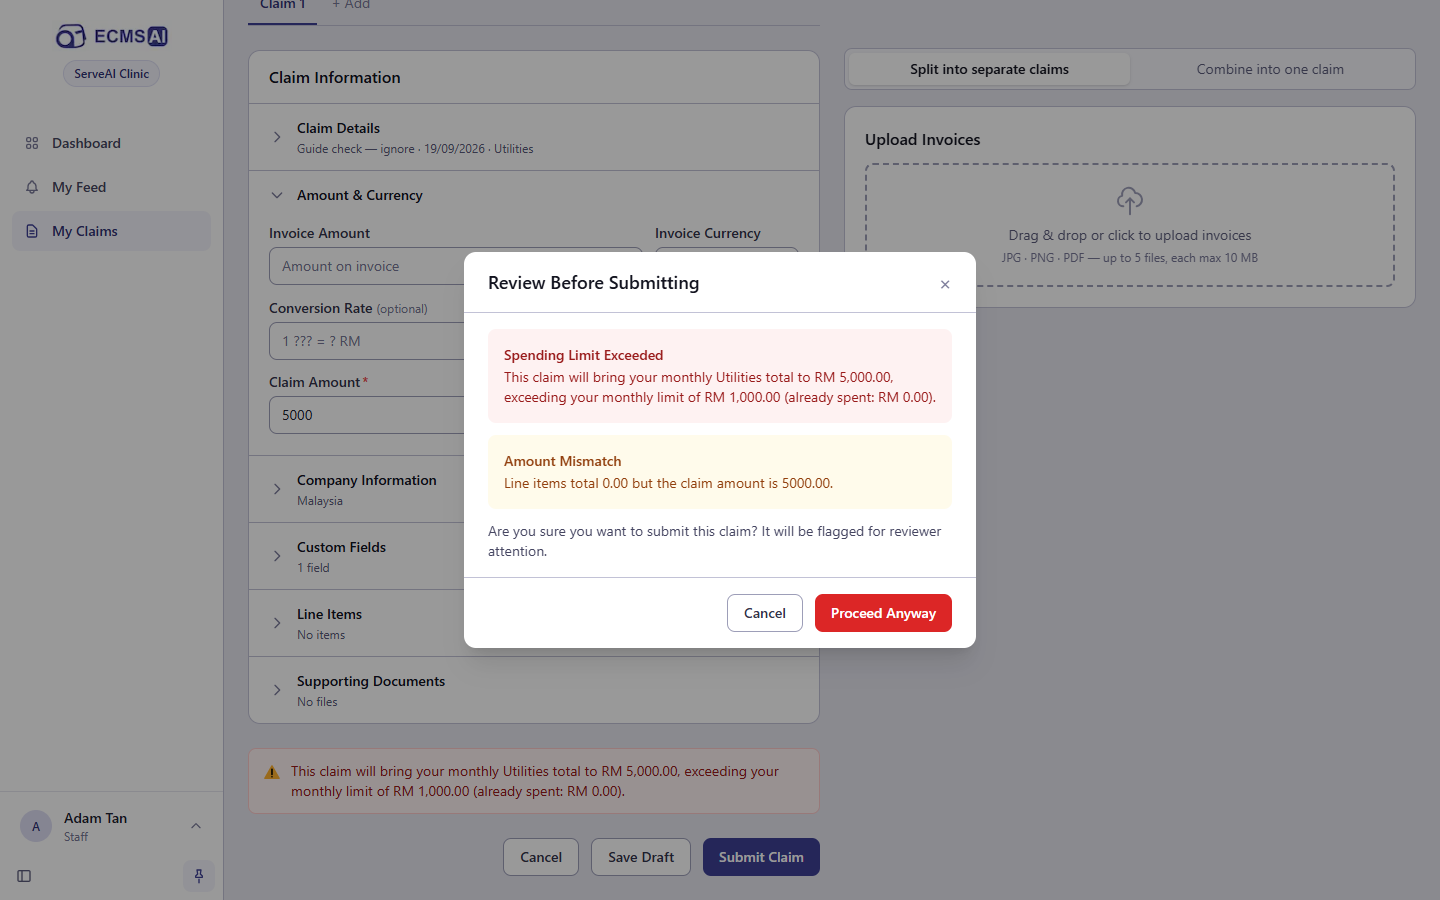
Select Proceed Anyway to submit regardless, or Cancel to go back and fix something first. Occasionally your organisation may configure one of these checks strictly enough to block submission outright rather than just warn you. In that case you’ll see an error message instead of this dialog, and you’ll need to change the claim or contact your administrator before you can submit.
Tracking your claim
- Select My Claims in the left-hand menu.
- Use the card or table view (a toggle near the top of the list remembers your preference) to browse your claims, each showing its current status.
- Select a claim’s title (in card view) or its View button (in table view) to open it and see its full detail, including its history of what’s happened to it so far.
What happens next: a claim’s status updates as it moves through approval. See How a Claim Moves for what each one means and who acts on it next. Any warning you saw (and proceeded past) when you submitted stays visible as a small flag on the claim afterwards, so it’s easy to spot which of your claims were flagged for a reviewer’s attention. In table view, a Draft or Submitted claim of yours also shows Edit/Delete or Retract directly in its row, alongside View, so you don’t always need to open it first.
Editing a claim before it’s approved
A claim can only be edited freely while it’s a Draft (or, once rejected, see Fixing a rejected claim below). Once submitted, it’s locked until it’s approved, rejected, or (if your organisation allows it) retracted back to Draft.
- Open the Draft claim from My Claims.
- Select Edit Draft.
- Make your changes, then select Save Draft to keep it as a Draft, or Submit Claim when you’re ready to send it for approval.
What happens next: any field can be changed, added to, or cleared: title, category, amount, receipts, line items, all of it. Nothing is sent anywhere until you submit.
Fixing a rejected claim and resubmitting
A rejected claim isn’t final. You can correct whatever the approver flagged and send it through again.
- Open the rejected claim from My Claims.
- Select Edit & Re-submit.
- Read the Rejection reason shown at the top of that page.
- Make whatever changes address the reason it was rejected, then select Re-submit Claim.
The rejection reason is also recorded lower down on the claim’s own page, under History, if you want to check it without opening the edit page.
What happens next: the claim goes through the same checks and warnings as a brand-new submission (see Submitting your claim above), and moves back to Submitted, starting approval over from the beginning, exactly as if you’d just filed it, including automatic approval again if it now qualifies. If you don’t need to change anything and simply disagree with the rejection, you can still open it and resubmit as-is; there’s no requirement that something be different.
Section 4
Approving
Reviewing, approving, rejecting, delegating.
This section is for anyone who gets claims sent to them to approve.
Whether you can approve depends on your permissions, not your job title. If you can see My Approvals in the sidebar, this section is for you. If you can see My Reimbursements, you can also act on the claims Finance handles, including any that nobody else has been asked to review. For what each claim status means and who acts next at every stage, see How a Claim Moves.
Finding claims waiting for you
Claims waiting for your decision collect on one page.
- Select My Approvals in the left-hand menu. A badge next to it shows how many claims are currently waiting on you. If you were named as an approver individually, rather than through managing a department or branch, this menu item may not appear for you even though claims are genuinely waiting on you. Ask your administrator for the address to go to directly in that case (the screenshot below is exactly this case: an individually named approver, reached directly at that address rather than through the menu).
- Look under Pending Review. It lists every claim currently waiting on your decision, oldest submission first.
- Use the card or table view (a toggle near the top of the list) to browse them.
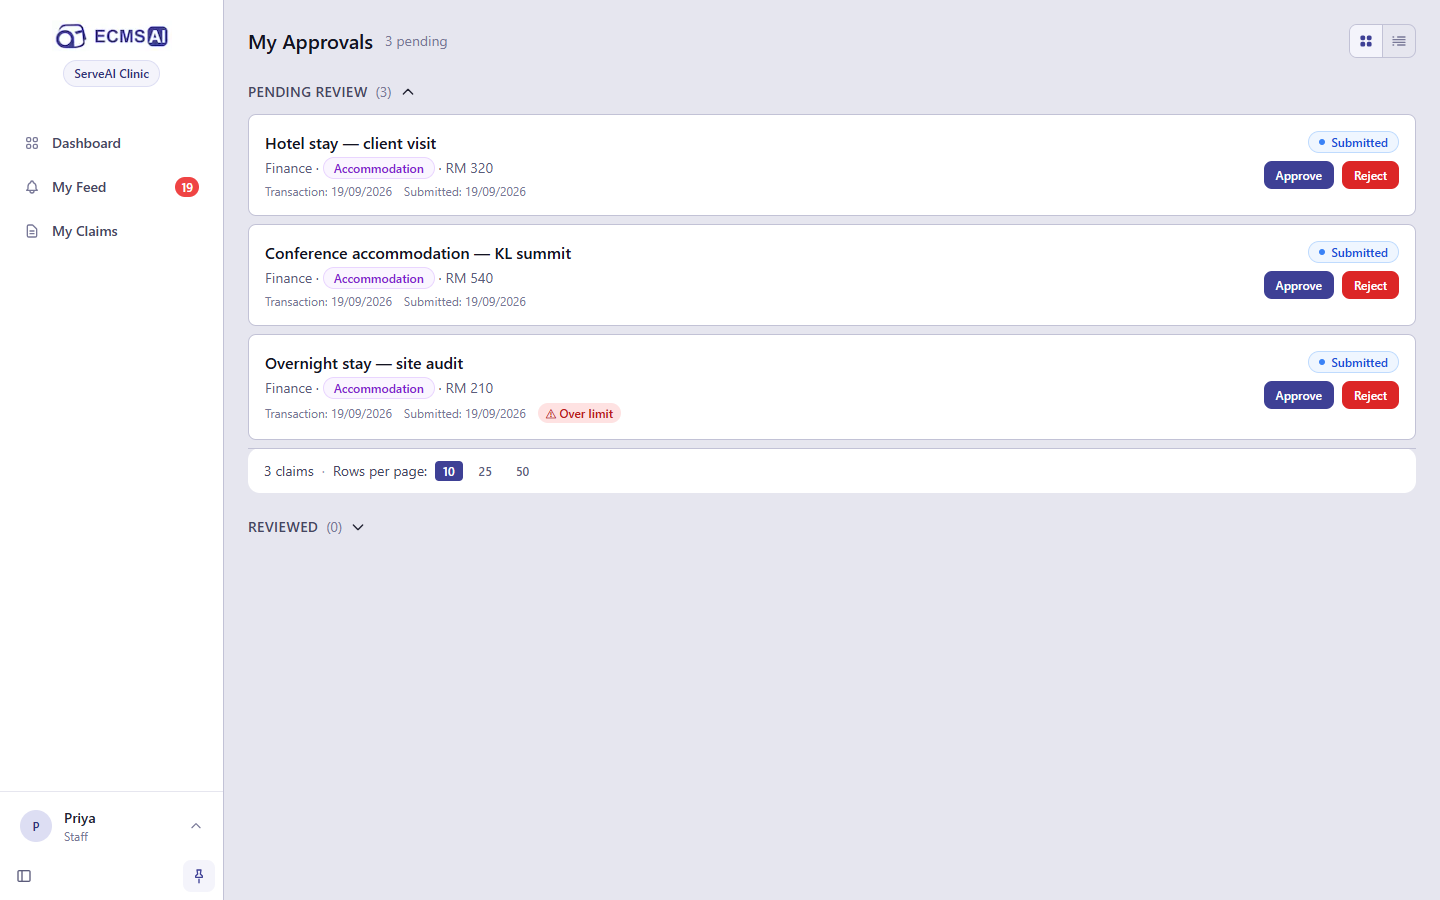
What happens next: select a claim’s title to open it and decide. See Reviewing a claim before you decide below. Once you’ve approved or rejected a claim, it moves out of Pending Review and into Reviewed underneath (collapsed by default). That’s a record of decisions you’ve already made, not something you can act on again from there.
Reviewing a claim before you decide
Before approving or rejecting, open the claim itself and check it properly rather than deciding from the list.
- From Pending Review, select the claim’s title to open it.
- Check, in particular:
- Claim Amount, and, if it was claimed in another currency, the invoice amount and conversion rate underneath it.
- Category. A Category may not match notice appears if the claim’s content doesn’t look like it belongs there.
- Any invoice or line items attached. Select View to open them.
- Any warning banner near the top of the page: an exceeded or approaching spending limit, a late submission, a mismatched amount, or a possible duplicate. If the claimant proceeded past a particular warning when they submitted, that banner also says so (“Acknowledged by the claimant at submission”). A banner with no such note wasn’t. The same warnings also show as small flags (for example, ⚠ Over limit or ⚠ Possible duplicate) on the claim’s row back in My Approvals, so you can spot a flagged claim before you even open it.
- History at the bottom of the page: the full timeline for this claim, including a previous rejection and resubmission, if it’s been through that.
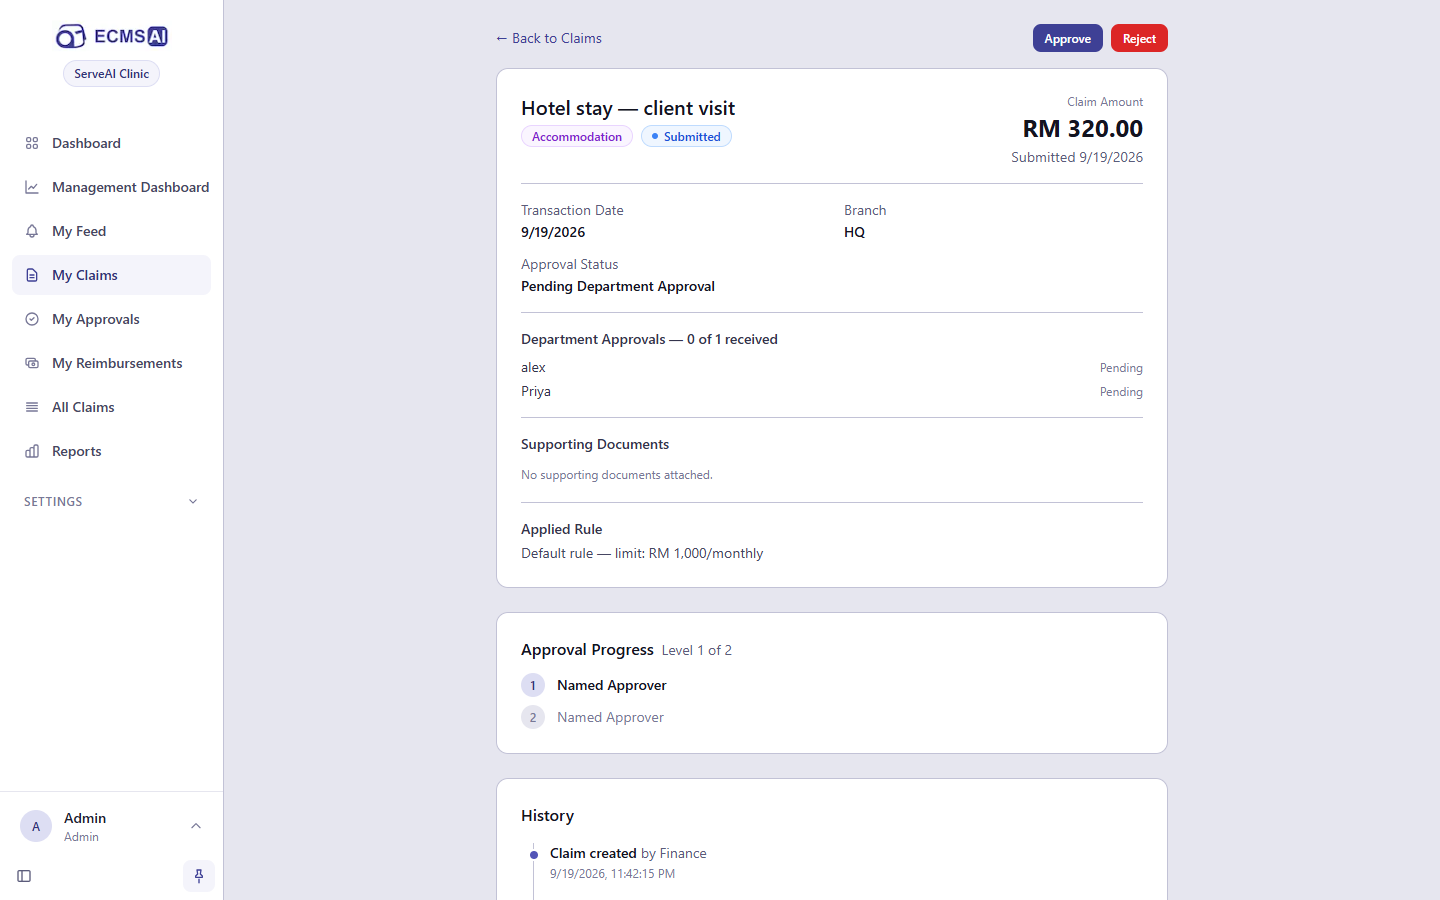
What happens next: this step doesn’t change anything by itself. It’s just what you check before deciding to approve or reject.
Approving a claim
Use this once you’ve reviewed the claim and it’s good to go.
- Open the claim, or find its row in My Approvals.
- Select Approve.
What happens next: if this is the only approval the claim needs, its status becomes Approved immediately and the claimant is notified right away. See Approved. If your organisation uses this: your approval might instead be one of several needed at the current step. In that case the claim stays Submitted, your decision is recorded, and nothing changes for the claimant yet, not until enough other people have also approved. See When a claim needs more than one approval below. A claim can also need to pass through a further step after yours; in that case it simply moves on to whoever is next, still Submitted.
Rejecting a claim and writing a reason
Use this once you’ve reviewed the claim and found a problem with it, or decided not to accept it.
- Select Reject, from the claim’s own page, or its row in My Approvals.
- In the Reject Claim dialog, enter a reason. This is required, and the claimant will see it.
- Select Reject to confirm.
What happens next: the claim moves to Rejected and the claimant is notified immediately, together with your reason. They can fix whatever was wrong and resubmit it. See Fixing a rejected claim and resubmitting. If you can see the My Reimbursements menu, you can also reject a claim that’s already Approved, if a problem turns up before it’s paid. An assigned approver can’t do this once their part is done.
Approving from an emailed link, without signing in
When a claim needs only one approval from one person, its approver can also act straight from the notification email, without opening the app or signing in at all.
- Open the email about the claim, and select its approval link.
- On the page it opens, review the claim summary shown: title, claimant, department, category, amount, transaction date, and any reference number or notes.
- Select Approve Claim.
What happens next: the page shows “Claim approved” with the claim’s title, and the claimant is notified immediately, exactly as if you’d approved it from inside the app. This page only offers approval. For anything else (rejecting, editing, viewing attachments), it tells you to log in to the app normally instead. Opening the same link again afterwards, or an old one for a claim that’s since been decided some other way, shows “This claim has already been approved” (or rejected, or whatever it now is) instead of the summary. Every link also stops working on its own after 7 days. Past that point, or if the link was never valid, it shows “This approval link is invalid or has expired” instead.
Nudging an approver who hasn’t acted
If you can see the My Approvals menu yourself, or the My Reimbursements menu, you can prompt a claim’s approver directly instead of waiting on them.
- Open the claim that’s waiting.
- Select Send Reminder.
What happens next: you see a confirmation naming the approver’s email address, a fresh copy of their one-click approval email is sent to them, and an Approval reminder sent entry, naming who it went to, is added to the claim’s History, visible to the claimant too. If your organisation uses this: Send Reminder isn’t offered at all once a claim needs more than one approval, or more than one approval step. Reminders currently only work for a claim with exactly one approver; contact that person directly instead.
Handing over your approvals while you’re away
If you have permission to do this: while you’re away, you can have your approvals go to someone else for a set period, without anyone having to change how claims are routed.
- Go to your organisation’s Delegations page (this isn’t linked from the menu, so ask your administrator for the address if you need it).
- Under Create New Delegation, enter the Delegatee User ID of whoever is covering for you. This box’s own placeholder text reads “MongoDB ObjectId”, which is just a technical way of saying it wants that person’s internal user ID, not their name or email. Ask your administrator for it, since it isn’t shown anywhere else in the app. Then set the Start Date and End Date to cover.
- Select Create Delegation.
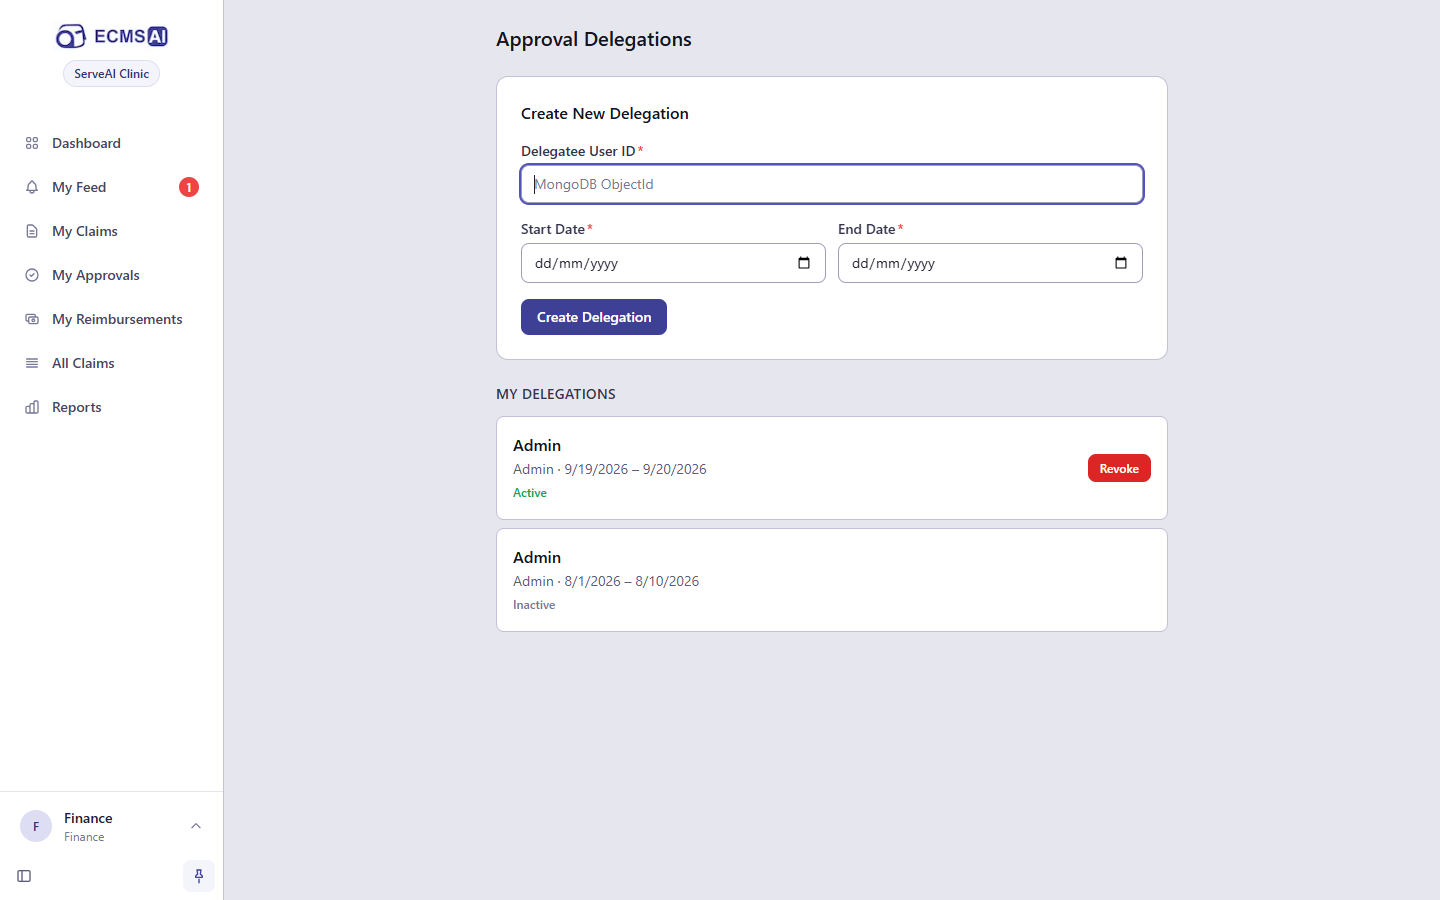
What happens next: for the whole date range, every claim that would come to you instead goes straight to your delegate. It appears in their own My Approvals, and they act on it exactly as you would have; you won’t see it in yours while the delegation is active. The delegation itself appears under My Delegations, showing who it’s for and whether it’s currently Active. Select Revoke beside it at any time to end it early and send new approvals back to you immediately. If you don’t revoke it, the same thing simply happens on its own once the end date passes: new claims route straight back to you without any further action. Either way, this only changes where the next claim goes. A claim already sent to your delegate while the delegation was active stays theirs to decide, in their My Approvals, even after you revoke the delegation or its end date passes. It doesn’t jump back to you mid-flight. You can only delegate to someone whose own access already covers everything yours does. The system refuses to create a delegation to someone with less access than you.
When a claim needs more than one approval
If your organisation uses this: some categories are set up to need more than one approval before a claim can move on, either through several people in sequence, or several people agreeing on the same step.
An Approval Progress panel on the claim’s own page shows where it stands:
- Each step is labelled by who it needs, Department Lead, Branch Lead, or Named Approver, with a Level X of Y count next to the heading showing which step is current.
- A step that needs more than one person’s agreement shows as Department Approvals, listing each person on it and whether they’ve approved yet or are still Pending, along with how many approvals it needs in total.
What happens next: the claim’s status stays Submitted throughout every step. See Submitted. It moves to the next step, or to Approved, only once the current one is satisfied. If you’re one of several people who can act on a step, your approval alone may be enough to complete it, or it may still need one or more of the others to act first, depending on how many approvals that step requires.
Section 5
Finance
Paying approved claims, batches, exports and reports.
This section covers paying approved claims and reporting on spending across the organisation. Access is permission-based, not a fixed role. If you can see the My Reimbursements menu in the left-hand sidebar, the payment tasks below are for you. If you can see All Claims or Reports without My Reimbursements, you can view and export claims but not mark them paid. For what each claim status means and who acts next at every stage, see How a Claim Moves.
Seeing everything waiting to be paid
Every claim that has cleared approval and is waiting to be paid collects on one page.
- Select My Reimbursements in the left-hand menu.
- Stay on the Queue tab. It lists every Approved claim not already grouped into a batch, most recently approved first.
- Use the Period filter to narrow the list by Approval Date or Submission Date, including the same quick presets (This month, Last month, Month to date, Year to date) used elsewhere in the app.
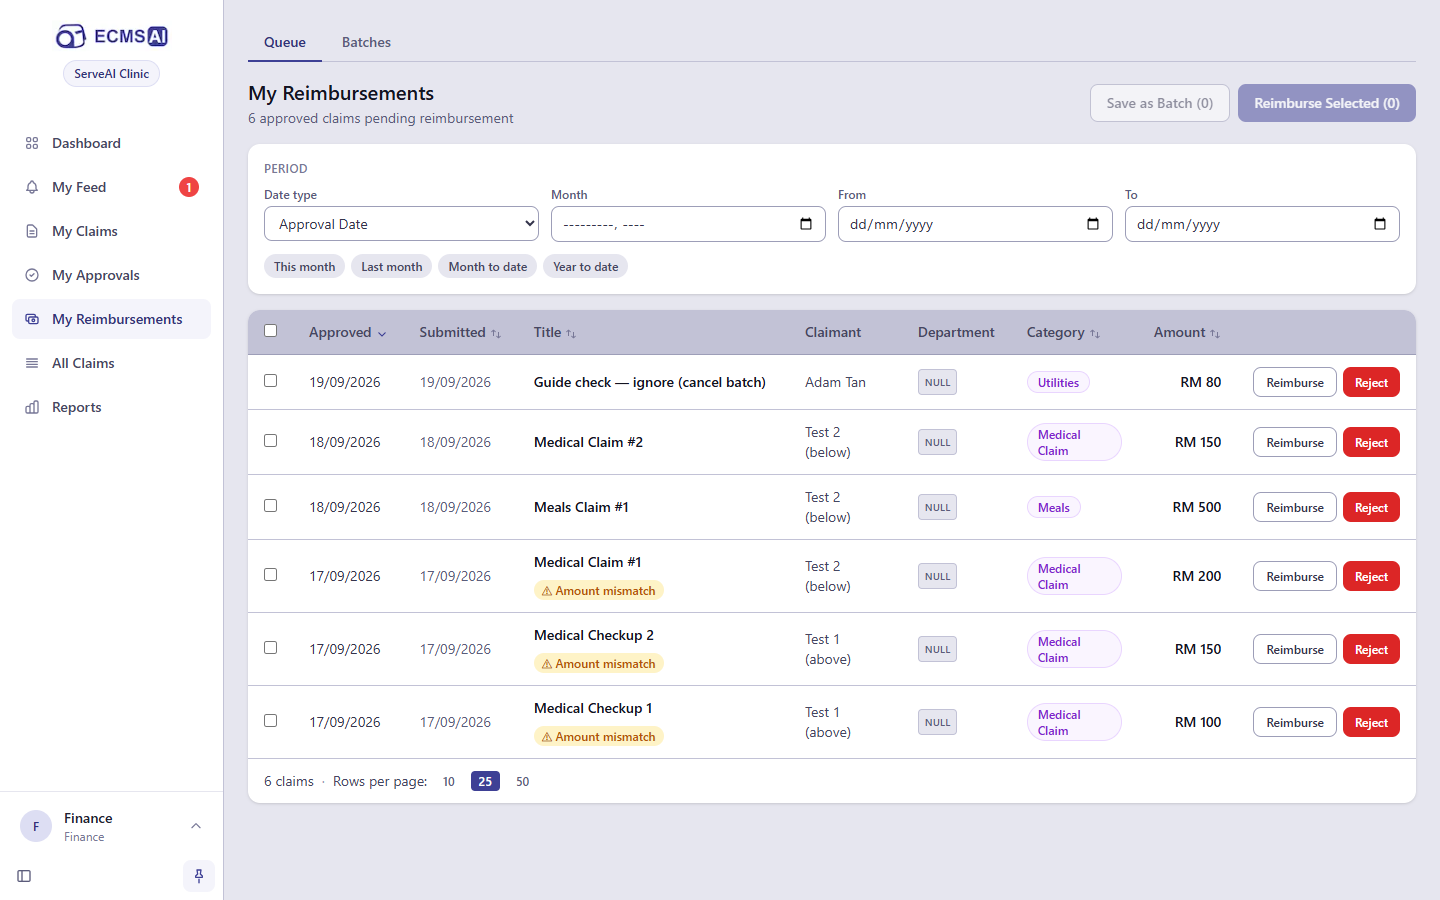
What happens next: select a claim’s title to open its full detail page, same as anywhere else in the app. From here you can pay a claim on its own, pay several at once, or set some aside as a batch. See below. A warning flag on a claim (for example, Amount mismatch) carries over from when it was submitted or approved; select it to see why. You can also select Reject on any claim here if a problem turns up before it’s paid. See Rejecting a claim and writing a reason. The same rules apply here as anywhere else Finance can reject an already-approved claim.
Paying a single claim
- Find the claim’s row on the Queue tab.
- Select Reimburse.
What happens next: the claim’s status becomes Reimbursed immediately. See Reimbursed. The claimant is notified right away, and the claim drops out of this queue for good.
Grouping claims into a batch, and why
Ticking claims and selecting Reimburse Selected on the Queue tab pays every ticked claim immediately, exactly like paying them one at a time, but it keeps no record afterward of which claims were paid together. Use a batch instead when you want that record: to match a set of claims against a single bank transfer or payroll run, to pay them gradually rather than all at once, or to hand the list to your accounting system (see the Excel round trip, below).
- On the Queue tab, tick the checkbox next to each claim to include. The header checkbox only selects claims on the current page. With a long queue, other pages aren’t included.
- Select Save as Batch (N).
- Enter a Batch Name (something that will mean something later, like a date range or payment run) and select Create Batch.
What happens next: the selected claims move out of the Queue tab and the batch appears on the Batches tab as Pending, showing its claim count and total amount. If a claim you ticked was no longer eligible by the time the batch was created (for instance, someone else had already started paying it), it’s left out and you’re told how many were dropped, rather than the whole batch failing. Open the batch at any time to pay some or all of its claims, export it, or cancel it. See below.
Paying some of a batch
Use this when only some of a batch’s claims are ready to be paid, for example, you’ve confirmed some payments went through and are still waiting on the rest.
- Select the batch’s row on the Batches tab to open it.
- Tick the claims you want to pay now. Only claims still Approved can be ticked. One that’s already paid, or that was rejected out from under the batch, shows no checkbox.
- Select Reimburse Selected.
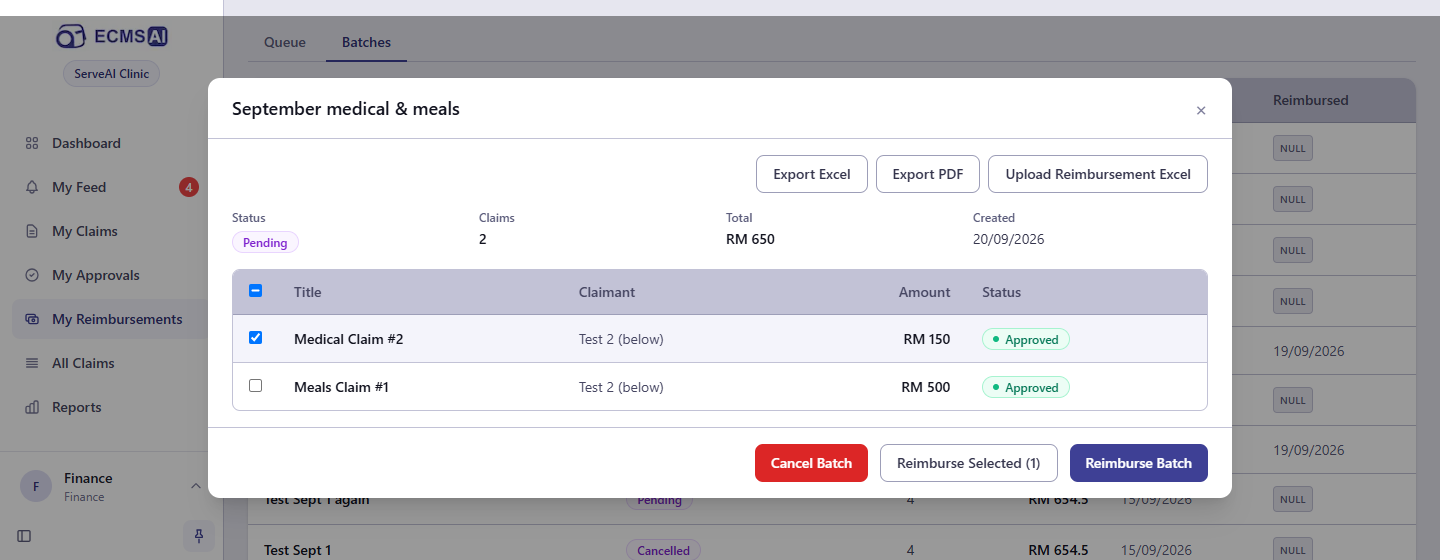
What happens next: each ticked claim is paid exactly like a single reimbursement. The claimant is notified for each one, and anything ticked that turned out to no longer be Approved is skipped and reported rather than causing an error. The batch itself only becomes Reimbursed once every claim inside it has been paid; until then it stays Pending, with the claims you just paid now showing Reimbursed in its list and the rest still waiting. Reopen it later to pay the remainder the same way, or pay everything left in one step. See next.
Paying a whole batch
Use this once you’re ready to pay every remaining claim in a batch at once.
- Select the batch’s row on the Batches tab to open it.
- Select Reimburse Batch.
What happens next: every claim in the batch still Approved is marked Reimbursed at once, each claimant is notified, and the batch itself becomes Reimbursed immediately. Unlike paying a batch down gradually (see below), Reimburse Batch closes the batch out regardless of whether every claim in it actually got paid this way (for instance, one already rejected out from under it earlier).
Using the Excel round trip to mark payments made in your accounting system
Use this when you process payments through your own accounting or banking system and want to record which claims were actually paid there, rather than marking each one by hand in the app.
- Open the batch on the Batches tab.
- Select Export Excel to download a workbook listing every claim in the batch, its claim details, a Claim Reference, and a Reimbursed column, and save it.
- Do your payment run in your own system, then open the saved workbook and mark TRUE in the Reimbursed column for every claim you actually paid. Leave it as FALSE, or blank, for anything not yet paid.
- Back in the batch, select Upload Reimbursement Excel and choose your edited file.
What happens next: a summary reports how the workbook’s rows were handled:
- Processed: the claim was marked Reimbursed, exactly as if you’d ticked it and selected Reimburse Selected.
- Skipped: nothing changed for that claim, either because you left it unmarked, or because it had already been reimbursed before you uploaded. Re-uploading the same workbook a second time is safe for this reason: a row for an already-paid claim is simply skipped again, never paid twice.
- Failed: the row couldn’t be applied at all, most often because the claim it names is no longer Approved (it was rejected, or paid a different way, in the meantime). The reason is shown next to the row; fix the mismatch and re-upload if you still want to record it this way, or handle that one claim individually from the batch’s own list instead.
As with paying a batch down gradually on its own list (see Paying some of a batch above), a batch you’re working through with the Excel round trip becomes Reimbursed only once every claim inside it shows as paid. Selecting Reimburse Batch instead, at any point, closes it out immediately regardless (see Paying a whole batch above). Don’t rename or reorder the workbook’s hidden Claim ID / Batch ID columns, and don’t mix rows from a different batch’s export into it. Claims are matched back by those columns, not by row position, and a workbook that doesn’t belong to this batch at all is rejected outright before anything is changed. If your organisation uses this: which claim details the workbook includes, and in what order, comes from a column layout your administrator has set up (see Setting the reimbursement report column layout). Without one, you’ll see a standard set of claim details instead.
A batch’s detail view also offers Export PDF next to these two buttons: a printable processing report scoped to just that batch’s claims, grouped by claimant with every claim listed underneath. See Producing the processing report below for what that report contains.
Cancelling a batch
Use this when a batch was grouped by mistake, or its claims need to be paid a different way.
- Open the batch on the Batches tab.
- Select Cancel Batch.
What happens next: the batch is marked Cancelled, and any of its claims not already paid return to the Queue tab, unpaid, exactly as if they’d never been batched. Nothing changes for a claim in it that’s already been marked Reimbursed. A cancelled batch stays on the Batches tab afterward as a record, but nothing more can be done with it.
Seeing every claim in the organisation
Use this to find or check on any claim, not just ones needing your action.
- Select All Claims in the left-hand menu.
- Use the status chips, filters, and card/table view toggle to narrow down what you’re looking for. These are the same controls as My Claims, plus organisation-wide Department and Branch filters. See Tracking your claim for how the view toggle and warning flags work.
What happens next: selecting a claim opens its full detail page, same as anywhere else. If you can see the My Reimbursements menu, an Edit button next to a claim in table view also lets you change its status directly. This is useful for correcting a mistake without going through the normal submit/approve/reject/reimburse flow. Choose the new status, give a reason if you’re rejecting it, and select Update Status; the claimant is notified exactly as they would be through the normal flow. Not every change is accepted: the system still enforces which transitions make sense for a claim’s current status, so an option that doesn’t apply may return an error instead of completing.
Building a report
Use this to see totals and breakdowns across claims, by category, department, branch, claimant or month, rather than looking at claims one at a time.
- Select Reports in the left-hand menu.
- Choose how to group the report, from the row of buttons at the top: By Category, if your organisation uses category groups: By Category Group, By Department, By Branch, By Claimant, or By Month.
- Optionally, choose a second breakdown from the then by dropdown next to it: another dimension for a nested sub-breakdown with the same figures at each level, or Each Claim to list every individual claim under its group instead of summarising further.
- Set the Period, a Month, a custom From/To range, or one of the quick presets (This month, Last month, Month to date, Year to date), and which date it applies to (Transaction Date, Submitted Date, or Creation Date).
- Narrow further with the Department, Branch, Category (and, if your organisation uses category groups: Category Group) and Claimant filters, and the Status chips, as needed.
What happens next: the table below updates as you change any of these, showing one row per group with its claim count, total amount, and a breakdown of how many of those claims are Approved and Reimbursed (each with its own total amount) and Rejected (a count only, since a rejected claim was never paid), plus a Grand Total row at the bottom. Choosing Each Claim as the second breakdown instead lists every claim under its group individually, with its own claimant and date, rather than further totals.
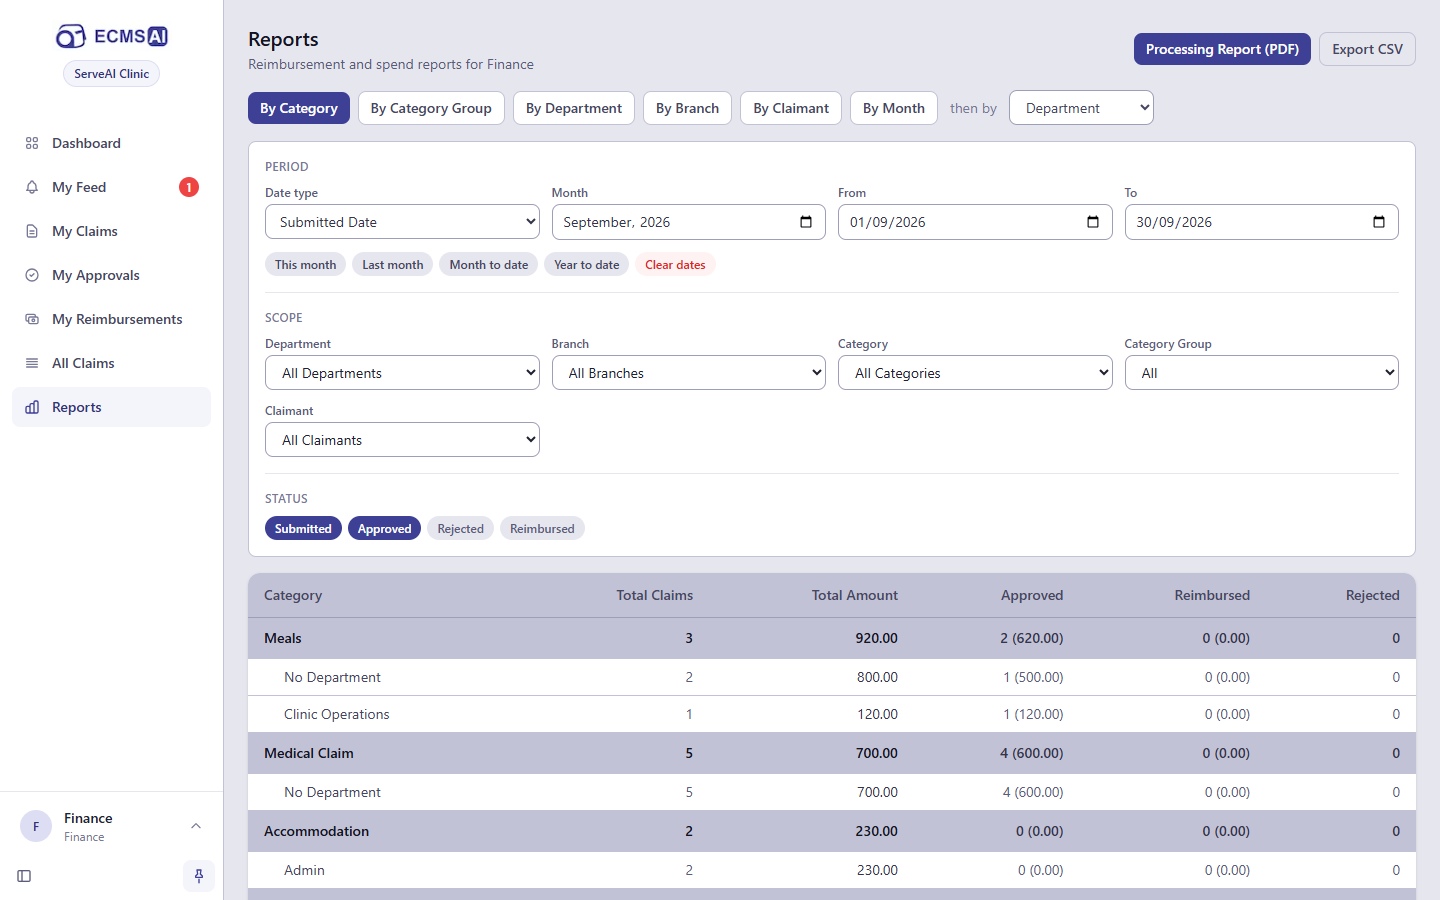
Select Export CSV at any time to download exactly what’s shown as a spreadsheet, with the same grouping and filters applied.
Producing the processing report (PDF)
Use this to get a printable, shareable record of a set of claims for filing or handing to someone outside the app.
- On the Reports page, set the grouping and filters you want the report to reflect, as above.
- Select Processing Report (PDF).
What happens next: a PDF downloads, opening with a summary page grouped exactly the way the preview above it was grouped: the same rows, totals, and second-level breakdown, if you set one, followed by one page per claim showing its own details, status, and line items, plus its attachments. Photos and PDF attachments are reproduced in full inside the report; anything else appears as a link instead. If you haven’t set a date range or status filter beforehand, the report defaults to this month’s Submitted and Approved claims.
Section 6
Administration
Categories, rules, departments, users, settings.
This section covers the settings an administrator configures: categories, spending limits and approval routing, departments and branches, users and roles, custom fields, and organisation-wide settings.
Whether you can see any of this depends on your permissions, not on having a fixed role. The pages below live under Settings in the left-hand menu, grouped under their own headings (Organization, Claims, System), and exactly which ones you see there follows from what your role is allowed to do (see Changing what a role can do). If you can see Settings at all, at least part of this section is for you.
Setting up a new organisation from scratch? Several of the tasks below assume a toggle in Organisation settings is already switched on: category groups, branches, multi-level approval, rate tables, accounting codes. Read that task first if this is your first pass through Settings. Then come back to the rest in whatever order suits you. If you’re only here to do one everyday task, like adding a category or adjusting a limit, jump straight to it as normal.
Adding or retiring a claim category
Categories classify every claim, and a spending limit or an approval rule attaches to them. Set these up before you write rules for them.
- Select Settings in the left-hand menu, then, under Claims, select Categories.
- Type a name into the New category name box (and a Code, if your organisation records accounting codes for categories, see Organisation settings) and select Add.
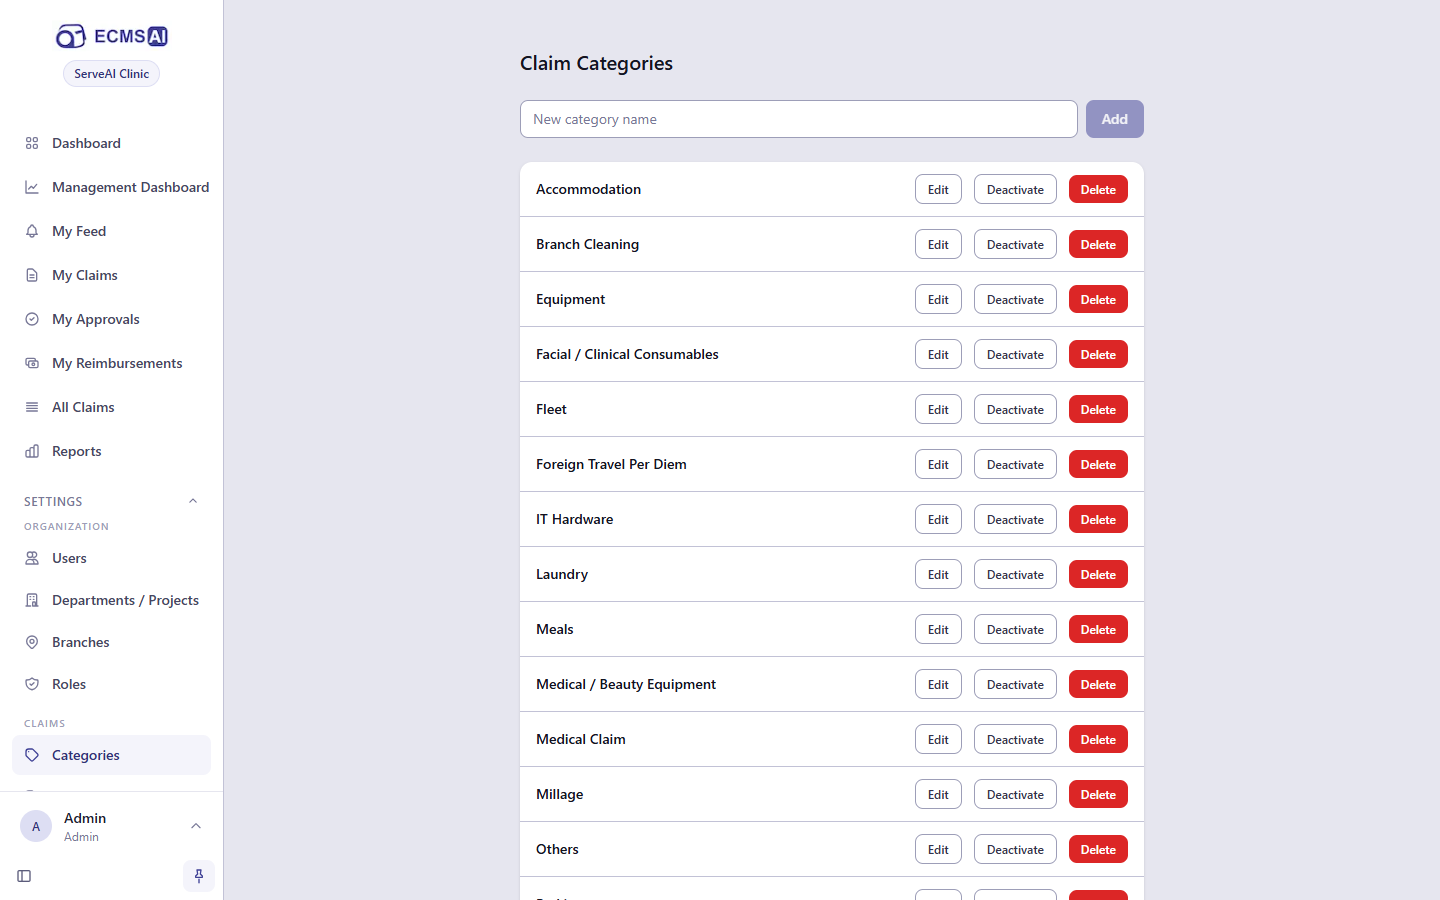
What happens next: the new category appears in the list right away and is immediately available on the claim form, for auto-detection, and when writing a rule.
To retire a category you no longer want offered, select Deactivate next to it rather than deleting it. This is fully reversible with Activate, and anything already recorded against it stays unaffected either way. It simply stops appearing as an option on new claims and rules. Delete is permanent and can’t be undone. If claims, rules, or category groups still reference it, the system refuses the delete and tells you how many are still attached, so deactivate instead in that case.
Grouping categories into accounting or limit groups
If your organisation uses this: categories can be organised into groups (for example Default, Project, and Staff Benefit) so the same category can carry a different accounting code and a different spending limit under each group. This is a beta feature your organisation turns on in Organisation settings. If you don’t see Category Groups under Settings, your organisation isn’t using it, and every category behaves as one shared pool, as described above.
- Select Settings in the left-hand menu, then, under Claims, select Category Groups.
- Type a name into the New group name box and select Add. A new group starts empty.
- Select Edit on the group to open its category checklist. Tick every category that belongs in this group, and optionally give each ticked category its own Code for this group specifically.
- Save your changes.
What happens next: claimants filling in the form now see a Group field before Category (see Filling in the details), and a rule can be written for a category within one specific group rather than for the category everywhere. A category left unticked in every group, or a rule with no group chosen (All groups), still applies everywhere as a catch-all. Your organisation starts with one protected Default group, the guaranteed home for every category. It can be neither deactivated nor deleted, because every category must always have somewhere to live. A custom group, by contrast, can be deactivated at any time, and deleted only once no claim or rule still references it.
Setting a spending limit on a category
A rule ties a spending limit, and separately who approves it, to one or more categories. This section covers the limit. See Setting who approves a claim below for the approval side of the same rule.
- Select Settings in the left-hand menu, then, under Claims, select Rules, then + New Rule. (You can also select Chat Interface to describe the rule in plain language and have it drafted for you to review on this same form instead.)
- On the Basics tab, search and tick one or more Categories: a single rule can cover several at once. If your organisation uses category groups: choose a Group first to limit the category list to that group, or leave it as All groups for a rule that applies in every group. Set Scope to Default (all users) to apply the rule to everyone, or User-specific to write a personal rule for one named employee. Scope alone doesn’t decide which rule wins if a user ends up matching both a Default and a User-specific rule for the same category. See priority order, below, for what actually does.
- On the Limits tab:
- Set a Period Limit, its Currency, and a Period (Monthly or Yearly; a yearly period can also repeat Every given number of years from a fixed Anchor Year, for an allowance that doesn’t reset annually), or tick No spending limit if this rule exists only to route approvals or apply a rate, without capping the total.
- Tick Mileage claim type and set a Rate per km if this category is claimed by distance rather than an invoice amount. See Claiming mileage.
- Tick Per-claim limit to additionally cap any single claim, on top of (or instead of) the period total.
- Set a Submission window (days) to require claims in these categories to be submitted within that many days of the transaction date (leave it blank for no deadline), and choose what happens to a late one under If a claim is late: Block submission refuses it outright, Warn and allow lets the claimant proceed past a warning.
- If your organisation has set up policy tables: choose a Rate table or Limit table to look the amount or cap up from a grid, for example by grade or country, instead of typing a fixed figure. See Setting up rate or limit tables below if you haven’t built one yet.
- Tick Pooled limit to share one cap across an entire Branch, Department, or the whole Organisation-wide, rather than tracking each person’s spending separately. Once pooled, choose an Enforcement of Soft (warn, allow override) or Hard (block submission entirely).
- Select Create Rule.
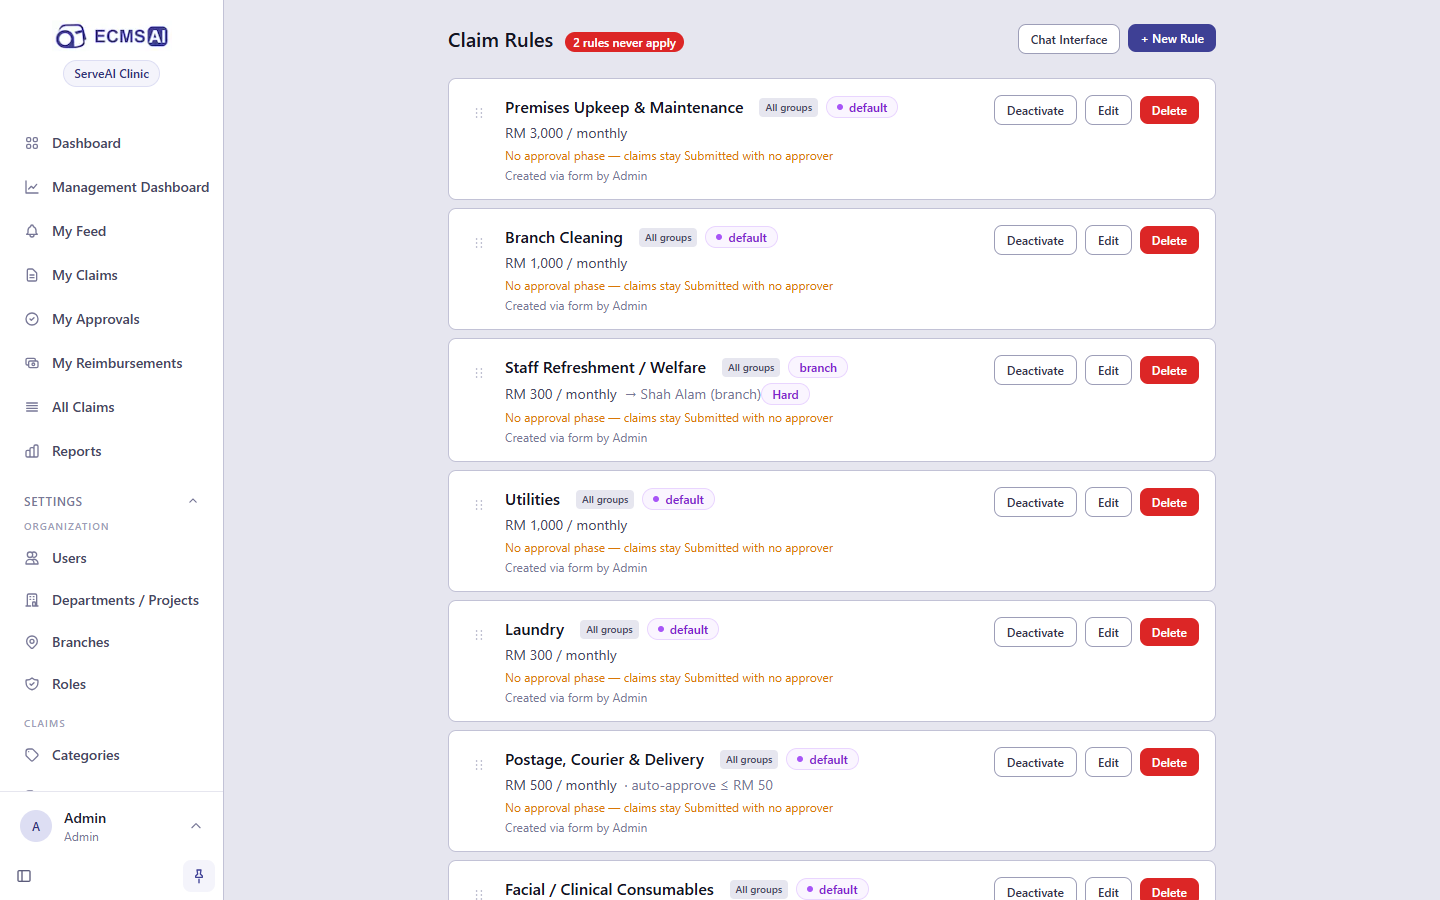
Use the Test a claim panel beside the form at any point to enter a sample amount and see exactly what it would trigger under the rule as configured, before you save it.
What happens next: claimants see their remaining allowance on the dashboard and while filling in a claim, and a warning if a claim would approach or exceed a limit. See Checking what’s left of your allowance and Submitting your claim, and what the limit warning means. A category with no active rule covering it has no submission deadline at all, just as it has no spending limit. Set one here for any category you want a deadline enforced on, and remember that two categories can carry two different deadlines (or none), depending entirely on how their rules are set up.
If the categories you chose are already covered by another active rule (including a Default rule for the same category as the User-specific one you’re writing, or the other way round), a Rule Conflict Detected dialog explains the overlap and tells you which rule would actually win before you can save. Create Anyway keeps both rules active. Which one actually applies for a given claim comes down entirely to priority order: the position of each rule on the Claim Rules list, with the one nearer the top winning, regardless of whether it’s the Default or the User-specific one. Replace instead deactivates the older one outright, as long as doing so wouldn’t strip it of every category it covers. Creating a new rule automatically places it immediately above whatever it overlaps, so it wins without you having to reorder anything by hand. But you can still drag rows up or down on the Claim Rules list at any time afterwards, and that’s exactly what makes the earlier assumption that “a personal rule always wins” unsafe: if a User-specific rule ever gets dragged below a Default one for the same category, the Default rule wins instead, silently. Check the list’s order after any manual reordering if you rely on a personal rule overriding a general one.
Setting who approves a claim, including several levels
The same rule that sets a category’s spending limit also decides who reviews a claim in it. That can be anywhere from nobody at all up to three approval steps in sequence, with a larger claim needing more.
- Open the rule (new or existing) and select the Approval tab.
- Tick Auto-approve and set a Minimum amount and Maximum amount to skip approval entirely for claims in that range, as long as the claim doesn’t trip this same rule’s own spending-limit warning. A claim flagged for something else instead, like a possible duplicate or a category mismatch, still auto-approves if the amount qualifies. Only its own limit check can suppress this.
- Build the Approval chain: select + Add an approval step, then choose Who approves: Department lead (the claimant’s own department, or one you name), Branch lead (only available if your organisation has enabled Branch-Level Approval; see Organisation settings), or Specific people (approvers you pick individually, shown to them as a Named Approver, with a How many must approve count if you name more than one).
- To require an extra step only once a claim passes a certain amount, select + Add amount band to add another row with its own limit (the topmost band is always left open, to cover every amount above the others), then + Add step on that band for the further level. A claim always walks its band’s steps in order, left to right.
- Select Create Rule or Update Rule.
What happens next: a submitted claim goes to whoever the first step names. See How a Claim Moves, and, if your organisation uses this, When a claim needs more than one approval, which covers what an approver sees for a quorum step or a multi-level chain. A Department lead or Branch lead step actually draws on that department’s or branch’s own configured pool of approvers and minimum-approvals count, not on anything set here. See Setting up departments and their managers below. If you leave a category with no approval chain at all, a claim in it stays Submitted with nobody assigned to act on it, visible only to whoever can see All Claims. See Seeing every claim in the organisation.
Setting up departments and their managers
Departments (labelled Departments / Projects) group your people and decide who a claim’s first approval step goes to.
- Select Settings in the left-hand menu, then, under Organization, select Departments / Projects, then + New Department.
- Enter a Name and pick a Manager. Tick which Members belong to this department.
- Leave Requires manager approval ticked so claims routed here need the manager’s sign-off. Untick it so they instead skip straight to Approved (or to the branch-lead step alone, if your organisation has enabled Branch-Level Approval).
- If your organisation has enabled Multi-Approval: tick two or more people under Approvers and set a Minimum approvals required to have a group of people share this department’s approval step, rather than the manager deciding alone.
- Select Create.
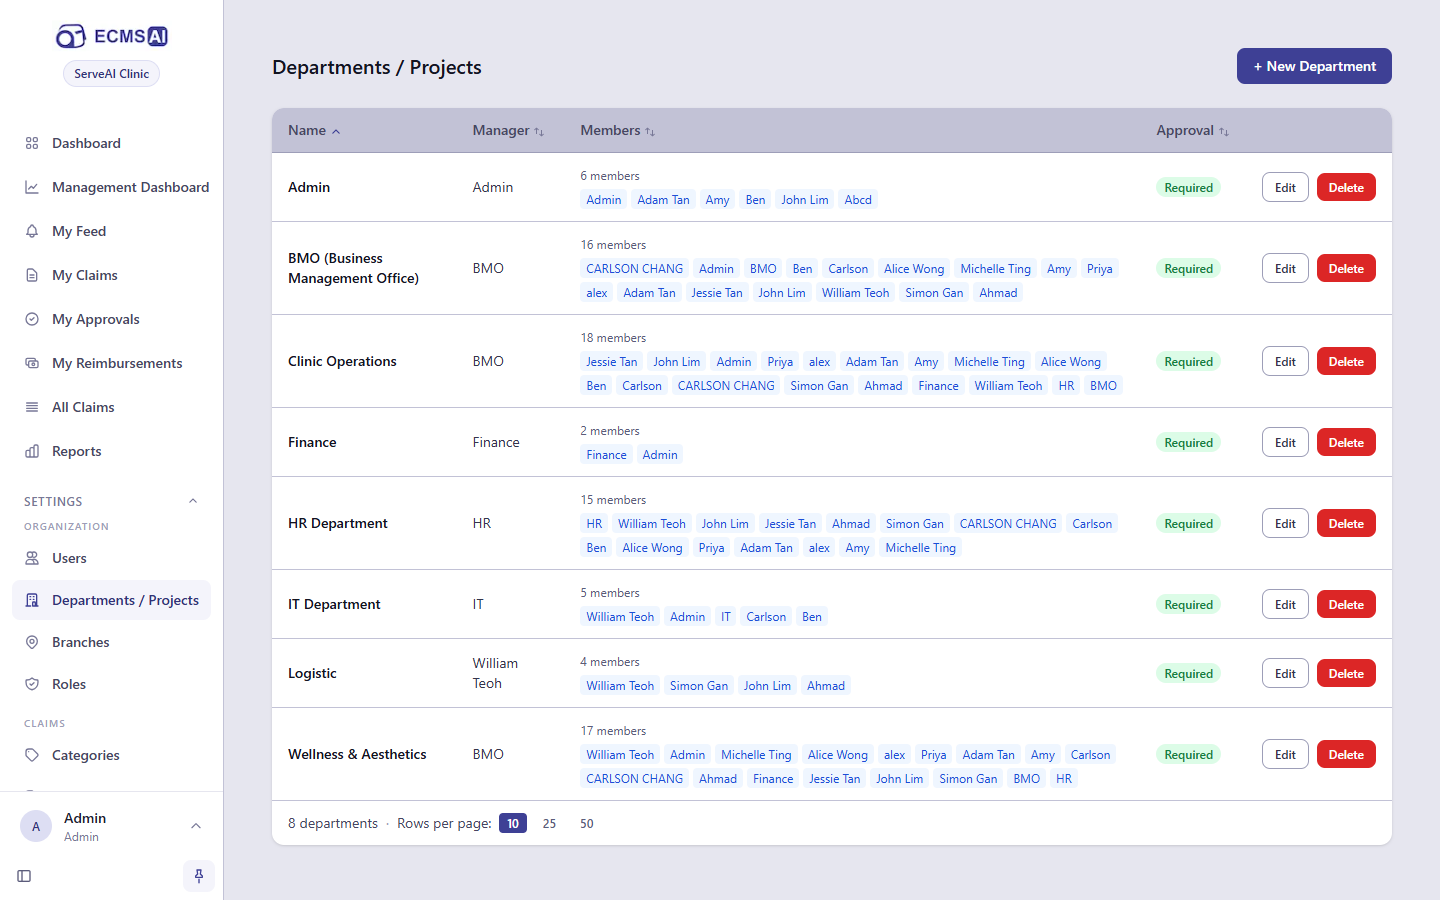
What happens next: any claimant in this department who submits a claim routed here goes to the manager (or the approver pool, if configured), exactly as described in Setting who approves a claim above. Deleting a department is refused while it has claims currently Submitted and awaiting its approval. Once none remain, deleting it unlinks it from any of its past claims and clears it as anyone’s default department, rather than deleting those claims too.
Setting up branches
If your organisation uses this: branches work much like departments, but for approval based on physical location or site rather than function, and only take part in approval routing once Enable Branch-Level Approval is turned on in Organisation settings.
- Select Settings in the left-hand menu, then, under Organization, select Branches, then + New Branch.
- Enter a Name, pick a Manager, and optionally a Region. Tick which Members belong to this branch. A member already assigned to a different branch is shown as such, and can only be moved across if your organisation allows branch reassignment.
- Select Create.
What happens next: once Branch-Level Approval is enabled, a claimant with an assigned branch has their claim require that branch’s approval before their department’s, wherever a rule’s approval chain includes a Branch lead step. See Setting who approves a claim above. Deleting a branch is refused while a claim is currently Submitted and awaiting that branch’s approval. Otherwise, its members simply lose their branch assignment.
Adding a user and giving them a role
- Select Settings in the left-hand menu, then, under Organization, select Users, then + Add User.
- Enter a Name and Email, and choose a Role from the dropdown. A Generated Password is filled in for you: select the copy icon to copy it, or the regenerate icon next to it for a different one. This is emailed to the new user. Leave Require password reset on next login ticked so they’re made to set their own password the first time they sign in.
- Optionally set a Branch, a Date of Birth, and tick which Departments / Projects they belong to (with one marked as their Default Department, if they’re in more than one).
- Select Create User.
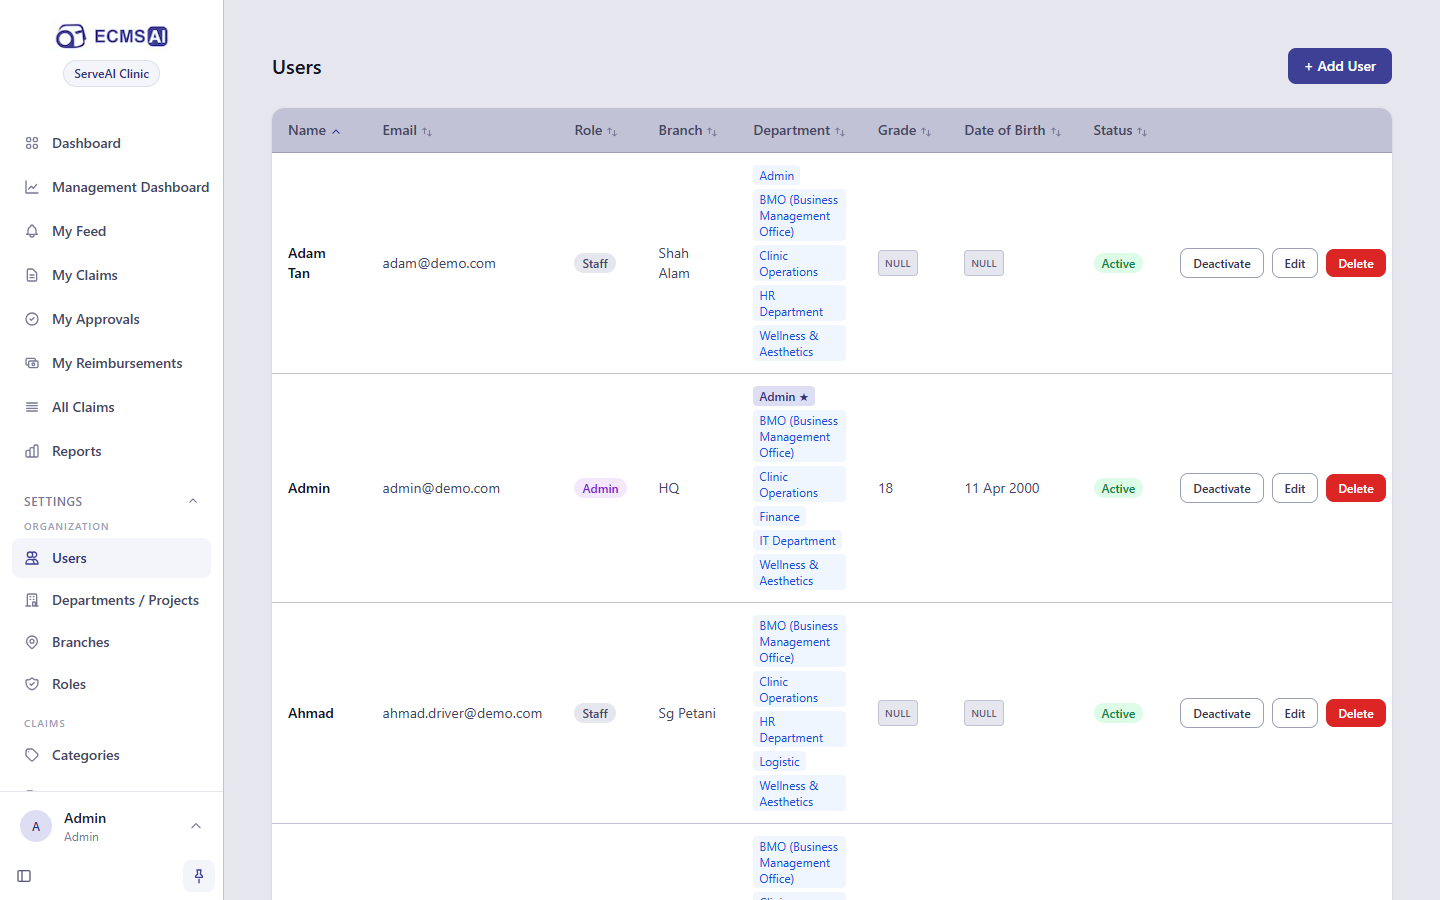
What happens next: the new user can sign in with the emailed password (and set their own, if you left the reset requirement on). If you chose one of your organisation’s built-in roles, their menu (which pages they can open, such as My Reimbursements, All Claims, Reports, or Settings) follows immediately from that role. If you chose a custom role instead, read Changing what a role can do below before assuming what they’ll see: a new user given only a custom role starts with the same, most-restricted menu as your most basic built-in role, regardless of which permissions that custom role carries. To remove someone’s access later, select Deactivate next to them rather than Delete, unless you’re certain it should be permanent. A deactivated user simply can’t sign in any more, while everything they’ve done stays on record.
What each built-in role can do
Every organisation starts with the same four built-in roles, and they keep these names: built-in roles can be viewed but not edited. Your organisation may also have custom roles of its own, so check your Roles page for the full list. The tables below describe the four built-in ones.
Two separate things decide what someone can do, and they don’t follow each other automatically: what their role has permission to do, and which pages their built-in role can open. Both tables matter, and the second one is the one people forget.
Permissions
| What it allows | Staff | Finance | Management | Admin |
|---|---|---|---|---|
| View all claims across the organisation, not just your own | yes | yes | yes | |
| Process claims, meaning approve or reject them | yes | yes | ||
| Mark as reimbursed, moving approved claims to Reimbursed | yes | yes | ||
| Manage any claim, editing or deleting someone else’s | yes | |||
| Export reports, including the processing-report PDF | yes | yes | yes | |
| Company dashboard, the organisation-wide spend figures | yes | yes | yes | |
| Management dashboard, the branch and cost-centre view | yes | yes | ||
| View member directory, the list of people in the organisation | yes | yes | yes | |
| Manage delegations, handing approval authority to someone else | yes | yes | ||
| Manage users, creating, editing and deactivating people | yes | |||
| Manage configuration: categories, departments, branches, tables | yes | |||
| Manage org settings, the general and currency pages | yes | |||
| View audit logs, the system-wide action log | yes | |||
| Manage roles, including assigning any role to anyone | yes |
Staff holds no permissions from this list. That is not a gap: submitting, editing and tracking your own claims needs none of them, and every role above can still do all of that.
Pages
| Page | Staff | Finance | Management | Admin |
|---|---|---|---|---|
| Dashboard, My Claims, My Feed | yes | yes | yes | yes |
| All Claims | yes | yes | yes | |
| Reports | yes | yes | yes | |
| My Reimbursements | yes | yes | ||
| Management Dashboard | yes | yes | ||
| The configuration pages under Settings | yes |
My Approvals is not in that table because it doesn’t follow the role at all. It appears for whoever manages a department or a branch, so someone on any role may or may not see it depending on whether claims are routed to them.
Two things follow from all this, and both catch people out:
- A built-in role cannot be edited or renamed. You can look at one to see what it holds, and you can build a custom role of your own, but the four above are fixed.
- Giving someone a custom role does not give them pages. Read the next task before you rely on one.
Changing what a role can do
A custom role changes which actions a user’s clicks succeed at. It never changes which menus or pages they can open. Which pages and menu items someone can even open is a separate thing, decided solely by which one of your organisation’s built-in roles they’re set up as. The two don’t automatically follow each other, and that’s important to understand before you rely on a custom role for anything.
- Select Settings in the left-hand menu, then, under Organization, select Roles, then + New Role.
- Enter a Name for the role.
- Tick each permission this role should have, grouped under Claims, Reports & Dashboard, Organisation, Settings, and Roles, for example View all claims, Process claims, Mark as reimbursed, Manage users, or Manage configuration (categories, departments, branches, and policy/rate tables). Take particular care with Manage roles: it lets whoever holds it create, edit, and delete roles, and assign any role to any user, including themselves.
- Select Create Role.
What happens next: read this carefully before assigning a custom role. Ticking a permission here does not, by itself, add or remove any menu item or page for whoever holds this role. Whichever pages someone can open, such as My Reimbursements, All Claims, Reports, or the Settings pages this whole section lives under, are still decided entirely by which one of your organisation’s built-in roles (your basic staff role, an approver/finance role, a management role, a full administrator role) that person is assigned. Ticking View all claims and Export reports on a brand-new custom role, then assigning it to someone whose built-in role is your basic staff one, will not put All Claims or Reports in their menu. The app still won’t offer them those pages at all, even though the specific actions those two permissions unlock elsewhere already work for that person.
What a custom role reliably changes is which specific actions succeed for someone who can already open a page some other way. For instance, an administrator’s custom role stripped of Manage org settings still opens General and Currency under Settings (since that comes from being an administrator), but selecting Save Changes on either is refused. Used this way, meaning you assign someone the built-in role that already gets them onto the pages they need, then switch their Role to your custom one, the pages they could already reach stay reachable. Exactly which of the actions on those pages they can perform now follows your custom role’s ticked list instead of that built-in role’s own defaults. Editing an existing custom role’s permissions takes effect immediately for everyone holding it. A custom role can be deactivated at any time: anyone holding it immediately loses its permissions, and it can no longer be newly assigned. It can only be deleted once nobody is assigned it any more, so deactivate it instead if that’s not yet the case.
Asking for extra information on a claim (custom fields)
Custom fields add extra dropdowns to the claim form for record-keeping, such as an entity, a project, or a cost centre, without affecting an amount, a limit, or who approves the claim.
- Select Settings in the left-hand menu, then, under Claims, select Custom Fields, then Add field.
- Enter a Name: this becomes both the label claimants see and the column header in the detailed CSV export.
- Fill in the Options claimants can choose from, either directly in the grid or by using Download CSV/Upload CSV to edit them as a spreadsheet.
- Tick Required if a claimant must answer this before submitting. Optionally set an Order to control where it appears among any other custom fields.
- Select Save.
What happens next: the field appears on the claim form under Custom Fields, marked with an asterisk if required (see Filling in the details), and as a column in the detailed CSV export. Select Deactivate to stop offering a field on new claims while keeping every value already recorded against it (it disappears from the CSV export while inactive). Delete removes its CSV column entirely, though claims that already recorded a value for it keep showing that value on the claim itself.
Setting up rate or limit tables
If your organisation uses this: a policy table looks a value up from a grid instead of using one fixed figure, for example a different mileage rate or per-diem limit by grade or by country. Setting a spending limit on a category above lets a rule point at one of these once it exists. This task is where you build the table itself.
- Select Settings in the left-hand menu, then, under Claims, select Policy Tables, then type a name into the New policy table name box, choose its Currency, and select Add.
- Select the table’s name to open it, then add a Column for each thing a claim needs to specify to look up its rate or limit (for example, Grade). Each new column also needs at least one Row giving the actual figure for each value that column can take.
- Add a Row for every combination your table needs to cover, entering the amount that applies to it.
What happens next: once a rule (see Setting a spending limit on a category above) is set to use this table instead of a fixed amount, a claimant choosing that category sees extra dropdowns matching your columns, and their claimed amount or limit comes from whichever row matches what they picked. Select Deactivate to stop a table being offered to new rules while keeping it intact for any rule already using it. Delete removes it outright.
Setting the reimbursement report column layout
If your organisation uses this: by default, the Excel workbook Finance downloads for a reimbursement batch (see Using the Excel round trip) uses a standard, fixed set of columns. This task lets you define your own layout instead. That’s useful if your accounting system expects the columns in a particular order, or needs ones the standard layout doesn’t include.
- Select Settings in the left-hand menu, then, under Claims, select Report Builder, then Add template.
- Enter a Name, then build the column list: select + Add next to any field under Available fields (standard claim fields and any custom fields your organisation has defined) to add it under Columns in this template. Reorder columns with the up/down arrows, rename any column’s label by editing it directly, or remove one with ×.
- Tick Set as default for reimbursement batch exports so this layout is the one Finance actually gets (your very first template is set as default automatically).
- Select Save.
What happens next: every reimbursement batch Excel export uses whichever template is marked Default from then on. Finance never chooses one themselves. Two columns are always added at the end of every export regardless of what you configure here, Claim Reference and Reimbursed, since the Excel round trip depends on reading them back. Until you create a template and mark one default, exports keep using a standard built-in column set. Deleting the current default template reverts to that same built-in set until you mark another template default.
Organisation settings
General and currency settings apply organisation-wide, and cover most of the optional behaviour mentioned elsewhere in this guide.
- Select Settings in the left-hand menu, then, under System, select General, to find:
- Allow Claim Retraction: lets a claimant pull a submitted claim back to Draft before it’s decided. See Tracking your claim.
- Invoices per Combined Claim: the most receipts a claimant can merge into one claim using the combine toggle on the upload box. See Starting a claim from a receipt photo or PDF.
- Enable Branch-Level Approval, Allow Branch Reassignment, and Enable Multi-Approval: covered in Setting up branches and Setting up departments and their managers above.
- Enable Rate Table: a separate beta page (not covered in this guide) for a simpler, named-item rate list, distinct from the policy tables covered in Setting up rate or limit tables above. Enable Category Groups turns on Category Groups above.
- Accounting Codes: separately switches on a Code field for Categories, Departments / Projects, Branches, and Users.
- Duplicate Detection: flags a claim that matches an existing one closely enough on the signals you tick (attachment, vendor name, amount, reference number, transaction date), with its own Block submission / Warn, allow anyway choice. See Possible Duplicate Claim. Select Save Changes once you’re done.
- Select Settings, then, under System, select Currency, to set the Default Claim Currency claimants start with on a new claim, and which currencies are in Allowed Currencies for them to choose instead. See Claiming in another currency.
What happens next: every toggle here applies the moment you save it, organisation-wide, for every claim submitted from then on. Nothing already submitted is changed retroactively. A stricter setting (for example, switching a warning to Block submission) is the difference between a claimant seeing the Review Before Submitting dialog they can proceed past, and an outright error they must resolve before they can submit at all.
Notification emails are not configurable from within the app. The wording of the emails this system sends (a new claim awaiting approval, a rejection, a reimbursement, and so on) is fixed. There’s no Settings page for it, so if your organisation needs different wording, that’s a request for whoever maintains the system for you, not something you can change here yourself.
One other page exists outside this Administration section that this guide doesn’t cover as a task of its own. A Management Dashboard (for whichever of your organisation’s roles includes Management or Administrator access) is a fuller version of the company-wide figures already described in What the dashboard shows. It’s a read-only report, not a setting, so it isn’t repeated here as a separate configuration task.
Section 7
Problems and Answers
What the system's messages mean, and what to do.
This section collects the messages the system actually shows when something goes wrong, what each one means, and what to do about it. It doesn’t repeat how the underlying features work. Where relevant, it links back to the section that does.
“Spending Limit Exceeded” or “Approaching Spending Limit”
What it means: the claim you’re filling in would go over, or close to, a spending limit your organisation has set for that category.
What to do: this is a warning, not a rejection. It appears in the Review Before Submitting dialog with a Proceed Anyway button, and you can still submit. See Submitting your claim, and what the limit warning means. If your organisation has configured this limit strictly (a Hard limit), you’ll instead see an outright error such as “This claim would exceed a hard-enforced spending limit and cannot be submitted.” In that case there’s no Proceed Anyway. You’ll need to reduce the amount, pick a different category, or ask your administrator about the limit.
“Submission Window Exceeded”
What it means: the category you claimed under only accepts claims within a certain number of days of the transaction date, and this one is older than that. This depends on what you’re claiming: another category may allow more days, fewer, or have no deadline set at all.
What to do: if that category only warns about a late claim, you’ll see it in the Review Before Submitting dialog and can still select Proceed Anyway. See Submitting your claim, and what the limit warning means. If it’s set to block submissions outright, you’ll instead see an error like “This claim cannot be submitted — its transaction date is 12 days past the 7-day submission window.” with no way past it from the form. Ask your administrator if you believe this claim should still be accepted.
A required field, or the category, won’t let you submit
What it means: something the form needs is still blank. Most often this is Title, Category, or Date of Transaction (see Filling in the details), or, if your organisation uses them, a Custom Field marked with an asterisk, which names the field it wants, in quotes, for example “Project Code” is required.
What to do: if clicking Submit Claim seems to do nothing at all, check whether a collapsed section (for example Custom Fields) is hiding the field that’s still empty. The form should jump to it and highlight it automatically, but if the page doesn’t move, open each section in turn and look for a field the browser is complaining about. If Category shows “This group has no categories yet.” under the group you picked, choose a different Group, or ask your administrator to add a category to it. An error naming a category as invalid, rather than the field being empty, usually means the category was retired while you were filling in the form. Refresh the page and pick again.
“Possible Duplicate Claim”
What it means: this claim looks enough like one you’ve already submitted (matching amount, vendor, reference number, or attached file) that it’s worth a second look before you file it again by mistake.
What to do: in the Review Before Submitting dialog, check the claim it’s comparing against. If this really is a new, separate expense, select Proceed Anyway. See Submitting your claim, and what the limit warning means. If your organisation blocks duplicates outright, you’ll instead see an error like “This claim matches existing claim(s) on amount, reference number and cannot be submitted.” with no way to proceed. Check whether you (or a colleague) already filed this expense, or contact your administrator if you’re sure it’s a genuine separate claim.
A file won’t upload
Several different messages can appear here, depending on what’s wrong with the file:
- “Invalid file type. Allowed: jpg, png, webp, pdf”: the file isn’t one of the types the system currently accepts for upload. This applies to receipts and to files added under Supporting Documents alike. The upload box itself lists Excel and Word among the file types it offers to pick, but the server rejects them regardless; only JPG, PNG, and PDF files upload successfully today. If you need to attach a spreadsheet or document, save or export it as a PDF first, or check with your administrator.
- “invoice.pdf” exceeds the 10 MB limit. (with your own file’s name in place of “invoice.pdf”): the file is larger than the system allows. Compress the image or PDF, or split it, and try again.
- “No text could be extracted from this PDF. It may be a scanned document — try uploading a JPG or PNG image instead.”: this is what you’ll see if you upload a scanned PDF with no selectable text from a claim’s own Edit page. From the + New Claim upload box, the same situation instead attaches the file quietly and marks it Extracted without filling anything in. See Starting a claim from a receipt photo or PDF. Either way, a JPG or PNG photo of the same document usually reads correctly where the PDF didn’t.
- “OCR extraction failed. Please try again.” or “Upload failed. Please try again.”: something went wrong partway through, often a temporary connection issue. Try uploading again. If it keeps failing, enter the claim’s details by hand instead and let your administrator know.
My claim has no approver
What it means: nobody has been set up to approve claims in this category. See Submitted and Setting who approves a claim. The claim isn’t stuck or lost. It’s genuinely waiting, indefinitely, for someone who can see every claim to pick it up directly.
What to do: you can’t push it forward yourself. Ask your administrator to either configure an approval chain for that category going forward, or to have whoever can see the All Claims menu look at this specific claim. See Seeing every claim in the organisation.
I can’t see a menu someone told me about
A few menu items only appear for certain people, even when you’re clearly involved in what they cover:
- My Approvals only appears if you manage a department or a branch. If you were named as an approver individually on a rule (a Named Approver) rather than through managing one of those, claims can genuinely be waiting on you without this menu item ever appearing for you. See Finding claims waiting for you. Ask your administrator for the direct address to your approvals.
- My Reimbursements, All Claims, and Reports each depend on which built-in role you’ve been assigned, not on any custom permission list. See Changing what a role can do. Being told you now have a permission like “view all claims” doesn’t put the page in your menu by itself if your underlying role doesn’t already carry it.
- Delegations has no menu link at all, for anyone. See Handing over your approvals while you’re away. You can only reach it by typing the address, which your administrator can give you.
If you believe you should see one of these and don’t, ask your administrator to check which built-in role your account is set up as.
I’m in the wrong organisation, or keep getting signed out
- “You do not have access to this organisation” at sign-in means the address you used belongs to an organisation you’re not a member of. Use the address or link your own organisation gave you, or sign in from the general sign-in page and choose from the list instead. See Choosing an organisation, and switching organisation.
- “You are not assigned to any organisation.” on the Select Organisation screen means your account exists but isn’t a member of anything yet. Contact your administrator to be added.
- If you’re suddenly returned to the sign-in page in the middle of working, with no message explaining why, it’s usually because your access changed while you were signed in. For example, your role or department membership was updated, or your account was deactivated. Sign in again. If that doesn’t work, or you weren’t expecting the change, contact your administrator.
- If you belong to more than one organisation and something looks unfamiliar (wrong claims, wrong people, wrong categories), check which organisation you’re currently in via Switching to a different organisation before assuming something is missing.
I didn’t get an email I was expecting
- For a password reset, seeing “Check your inbox” doesn’t confirm an email was actually sent. By design, it looks the same whether or not an account exists for that address, and the link inside expires after 60 minutes. See Forgetting your password. Check your spam folder, confirm you used the email address your organisation has on file for you, and request a new link if the old one expired.
- For a claim notification (a new approval waiting, a decision on your own claim), check My Feed in the app first. See Finding your notifications, since the in-app copy always arrives even if the email doesn’t. If you’re an approver waiting on someone else, you (or the claimant) can select Send Reminder on the claim to send a fresh copy of the approval email. See Nudging an approver who hasn’t acted.
- If emails are consistently missing across the board, the most likely causes are outside your control, such as a wrong address on your account, or your organisation’s mail being filtered somewhere along the way. This is one to raise with your administrator rather than retry on your own.
Signing in fails with “Invalid email or password”
What it means: the system doesn’t distinguish between a wrong email and a wrong password, for security. The same message covers both, and also an account that has never had a password set (for example, one that only ever signs in via SSO).
What to do: double-check both fields, and try Forgetting your password if you’re unsure. If your organisation offers Sign in with Microsoft (or another provider), try that instead. See Signing in with your company account (SSO). A separate message, “Account is inactive”, means your account has been deactivated. This isn’t something a password reset fixes, so contact your administrator.
An approval link says the claim was already handled, or has expired
Opening an approval link a second time, or one for a claim someone already acted on another way, shows “This claim has already been approved.” (or whatever it now is) instead of the claim summary. A link also stops working on its own after 7 days, showing “This approval link is invalid or has expired.” Neither is an error to fix. Sign in to the app normally to check the claim’s current status instead. See Approving from an emailed link, without signing in.
A button says “Insufficient permissions”
What it means: whatever you clicked, such as approving, rejecting, deleting, or editing, isn’t something your account is allowed to do, either in general or for that specific claim (for example, trying to act on a claim that isn’t actually assigned to you).
What to do: this isn’t something you can override yourself. If you believe you should be able to do this, contact your administrator. See Changing what a role can do for why having a permission and seeing the page it applies to aren’t always the same thing.
None of this replaces your own organisation’s help. If a message here doesn’t match what you’re seeing, or the suggested fix doesn’t work, contact your administrator. They configure how your organisation’s claims, rules, and approvals actually work, and can see things about your account and your organisation’s setup that this guide can’t.